
This holiday season, I wanted to create something, joyful, and genuinely fun to work up—so I reached for the yarn that’s quickly becoming my go-to for festive makes: Scheepjes Little Darling and Little Darling Sparkle.
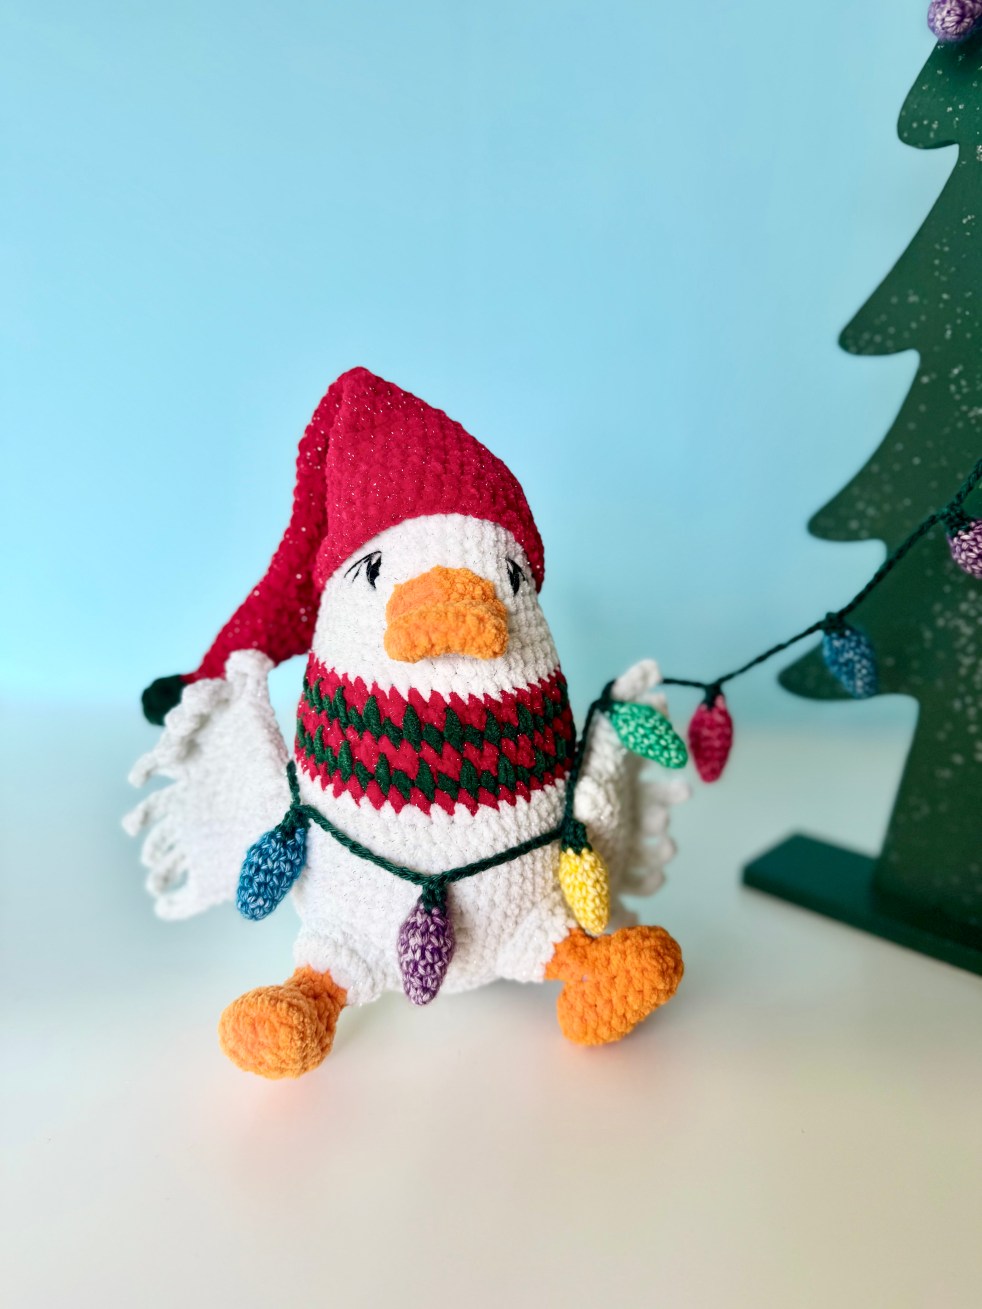
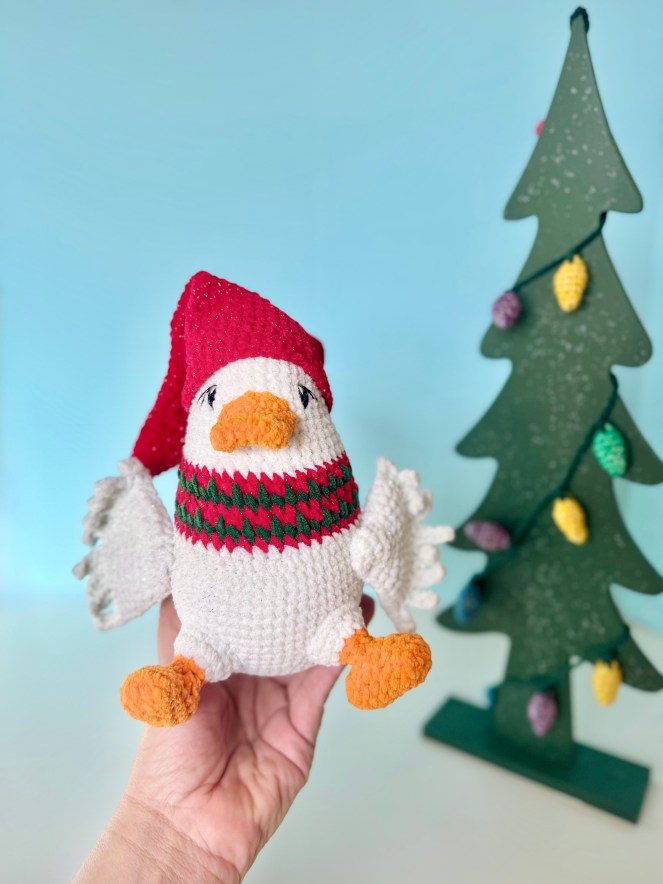
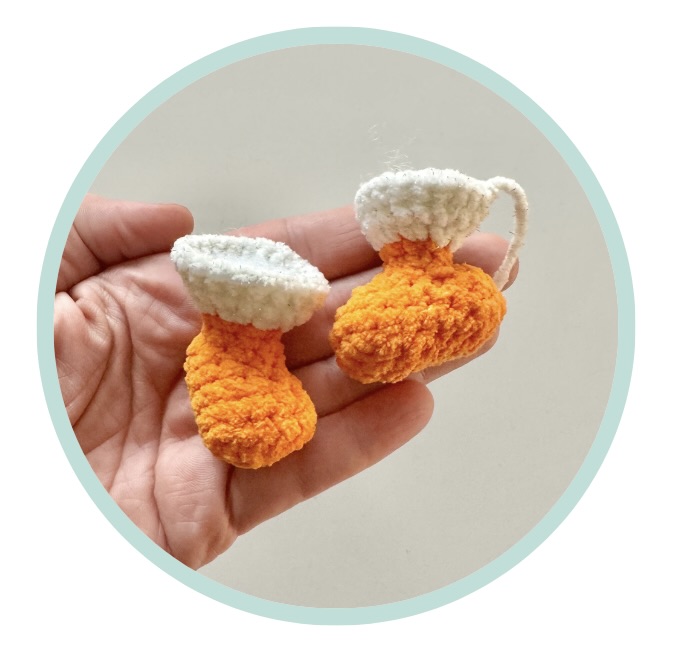
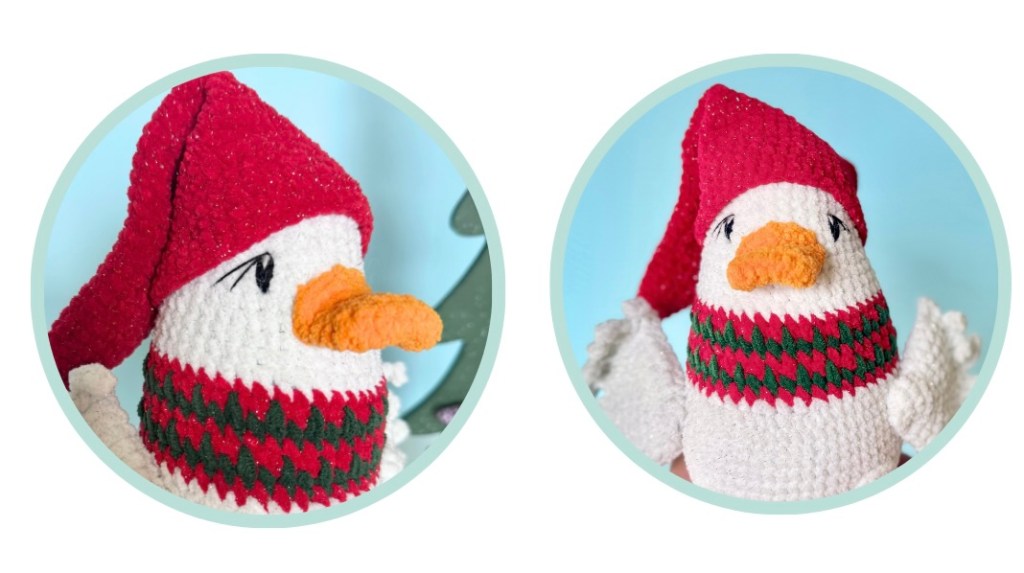
I’m thrilled to share Juniper Frost, a free Christmas duck crochet pattern, a cozy little character that brings together everything I love about this yarn line: softness, structure, and just the right amount of shimmer.
Did you know that I helped Scheepjes curate their first chenille yarn?? I have an entire blog post about my journey helping Scheepjes, if you are interested in that process and the Little Darling palette boxes that were made specifically for my patterns!
Little Darling is a lightweight chenille that’s sturdy, frog-friendly, and wonderfully consistent, making it perfect for both beginners and seasoned amigurumi makers. The plush texture gives each stitch a clean, rounded look, while the Sparkle version adds a gentle glimmer without compromising softness which is a rare and very welcome combination when working with chenille. The yarn’s palette options, from classic brights to holiday ready shades, make mixing and matching a breeze for projects like this one.
Designing this duck reminded me why I reach for Little Darling so often: it works with you, not against you. Stitches sit neatly, shaping stays crisp, and the whole piece comes together quickly, making it ideal for last minute gifting or adding a handmade touch to your decor. I hope this sweet little duck waddles right into your holiday traditions and brings as much joy to your hook as it brought to mine.
Did you know that Scheepjes is now on Amazon? You can find your favorite yarns here!
You can find the pattern for the String of Lights HERE! I love this pattern. It adds such a fun touch to amigurumi projects, or even using as a cute Christmas decor!

Materials
- 3mm crochet hook
- Stitch markers
- Scissors
- Weaving needle
- Yarn (See below)
- Polyfil
- Black/White embroidery thread
Yarn Used
Scheepjes Little Darling Sparkle
- Ice Bear Sparkle (50g)
- Cherry Sparkle (40g)
- Pickle Sparkle (10g)
Scheepjes Little Darling
- Pumpkin (8g)
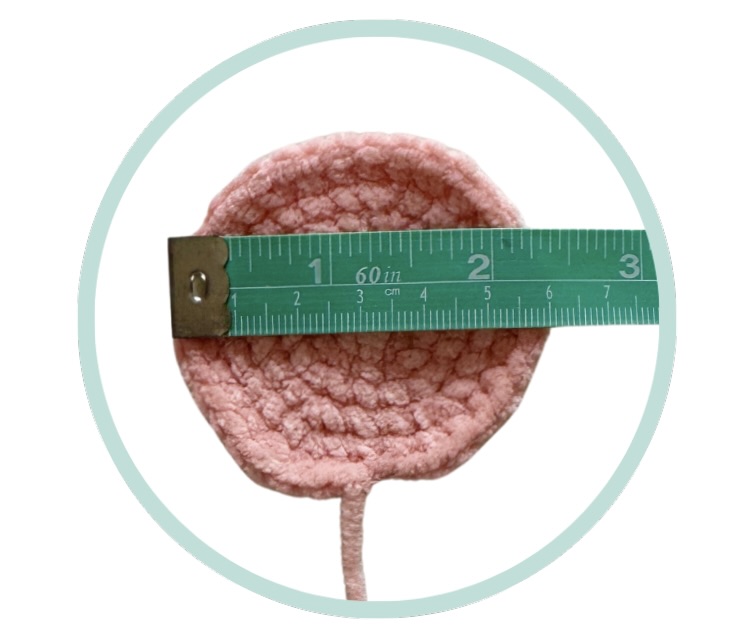
Let’s talk gauge while making amigurumi!
When it comes to amigurumi, there’s no strict gauge to follow the way there is with garments—but tension still matters, especially when you’re trying to keep your yarn usage within a single 50g skein. Little Darling and Little Darling Sparkle are wonderfully consistent chenille yarns, but everyone’s hands work a little differently. If you know you tend to crochet with a looser gauge when using chenille, I highly recommend making a quick swatch before starting. This will help you match my tension more closely and ensure you don’t run short.
For this project, one skein each of Ice Bear Sparkle and Cherry Sparkle is enough if your tension is similar to mine. But if you naturally work with looser tension, or just want peace of mind, I suggest picking up a second skein of each color. And for those who prefer to match my exact tension, I’ve included an optional gauge swatch section below to guide you. This gauge is using Little Darling which is the exact same weight as Little Darling Sparkle.
Let’s make a swatch!
Make the gauge swatch using Pumpkin, since it is the color used least in the pattern.
Use a 3mm hook and make the following rnds.
Rnd 1: Ch2, 6sc in the first ch (6)
Rnd 2: inc x 6 (12)
Rnd 3: [sc, inc] x 6 (18)
Rnd 4: [sc, inc, sc] x 6 (24)
Rnd 5: [3sc, inc] x 6 (30)
Rnd 6: [2sc, inc, 2sc] x 6 (36)
No need to FO. We will be taking a measurement and then pulling out the swatch to reuse this yarn.
My swatch measures 6cm. Adjust your hook accordingly.
Abbreviations
Rnd(s) – round(s)
chX – chain X amount of stitches
MR – magic adjustable ring
st(s) – stitch(es)
sl st – slip stitch
sc – single crochet
hdc – half double crochet
inc – 2sc in the same stitch
dec – invisible decrease
hdcinc – 2hdc in the same stitch
spike st – Insert your hook into the row below the next st, pull up a loop to level out with the new rnd, then finish the sc like normal. Do not work into the st the spike st covers, unless otherwise instructed. See below.
PM – place marker
BLO – back loop only
FLO – front loop only
FO – fasten off
Safety Reminder
If you are using safety eyes or small embellishments, please note they are not recommended for children under 3 years old. For younger children, embroider the eyes and details, or add a safety note for precaution.
Legal
This pattern is for personal use only. You may sell the items that you make from this pattern, but I ask that you please refer back to ©️SarahDeeCrochet as the designer. Altering, reproducing, or selling this pattern, online or in print is strictly prohibited. This pattern is protected by international copyright laws.
Specialty Techniques
Working around a sc foundation row.
Sometimes you will start a pattern with a sc foundation row. When this happens, each side of the row will count as workable sts. Work through the back humps of the ch, to give a cleaner look when working Rnd 2. Place your marker in the last st of the Row. The 1st st in Rnd 2 will be the next workable st on the opposite side of the foundation row.
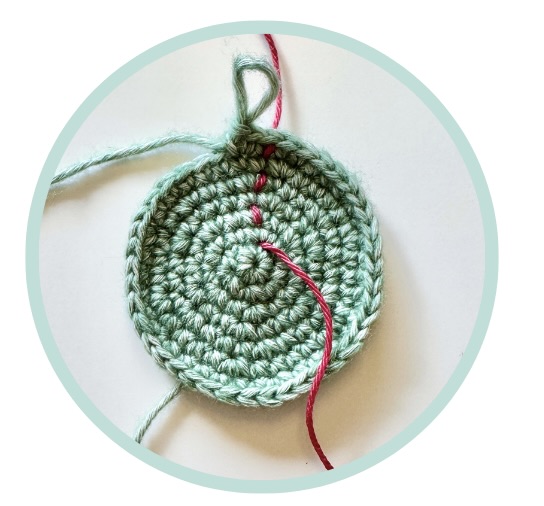
Using a running stitch marker
Using a running st marker when making amigurumi can be a game changer. It helps you keep track of your progress, rnd by rnd. By providing a visual cue to mark the end of each rnd, we can help reduce the likelihood of mistakes, especially in more complex patterns or with yarn that can be a bit fiddly to work with.
I prefer to use a scrap piece of cotton yarn, in a contrasting color, for my running stitch marker so there are no fiber transfers. (Using a fuzzy yarn can leave behind an unwanted trail.) Simply use your crochet hook to weave the piece of cotton in and out of the last st of the round, creating a woven st marker that can be easily removed when we are finished with our project. Just pull on one end and it will come right out!
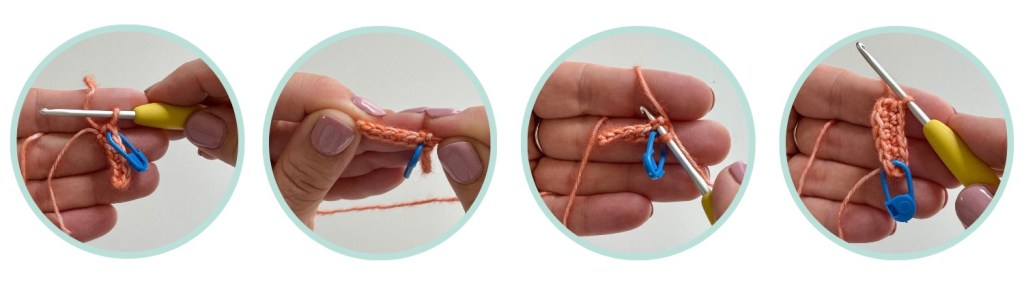
Using a ch2 instead of a magic ring
Sometimes chenille yarn can be difficult to make a proper magic ring without the yarn breaking or getting the right closure. Instead, I begin all sections worked in the round with a ch2. You will ch2, and work your first rnd into the first ch made, as you would a magic ring. Continue on with Rnd 2. *TIP* Pull your second ch st tight before you start crocheting, so you don’t have any unwanted loops.
Pattern
Tail Feathers x 2
Using Ice Bear Sparkle
Rnd 1: Ch7, starting in the 2nd ch from hook, 6sc across through the back humps. (12)
Both sides of the foundation row are counted as sts.
Rnd 2: Work in the next available st, on the opposite side of the piece, inc, 5sc, continue working around, inc, 5sc (14)
Rnd 3-4: (2 rnds) sc in each st (14)
Rnd 5: dec, 12sc (13)
Rnd 6: sc in each st (13)
Rnd 7: 6sc, dec, 5sc (12)
Rnd 8: sc in each st (12)
Rnd 9: [2sc, dec, 2sc] x 2 (10)
Rnd 10: sc in each st (10)
Do not stuff.
Rnd 11: sc until you get to the side of the feathers, 5sc across both sides to close. (5)
FO, and cut yarn.
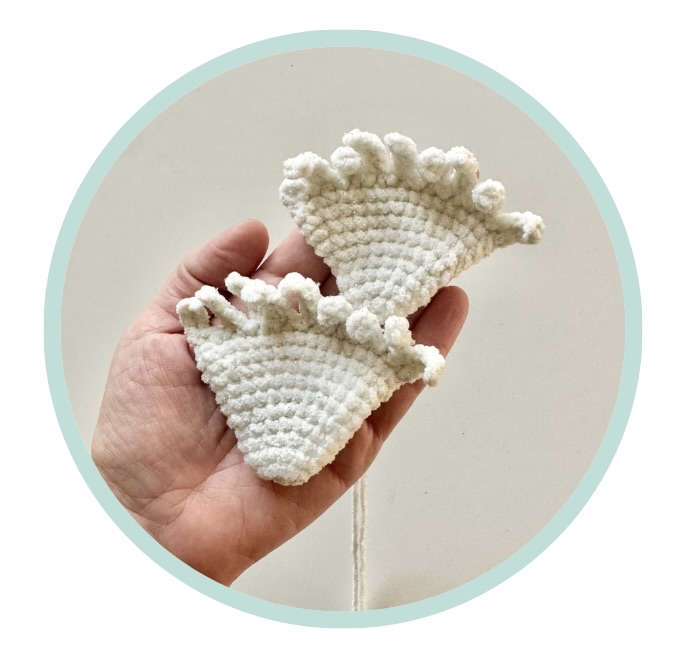
Wings x 2
Using Ice Bear Sparkle
Rnd 1: 6sc in a MR (6)
Rnd 2: inc x 6 (12)
Rnd 3: [3sc, inc] x 3 (15)
Rnd 4: sc in each st (15)
Rnd 5: [2sc, inc, 2sc] x 3 (18)
Rnd 6: [sc, inc, sc] x 6 (24)
Rnd 7: sc in each st (24)
Rnd 8: [3sc, inc] x 6 (30)
Rnd 9: sc in each st (30)
Rnd 10: [2sc, inc, 2sc] x 6 (36)
Rnd 11: sc in each st (36)
Rnd 12: Fold the wing in half and work through both sides for Rnd 12. Do not stuff the wings. [sc, ch5, starting in the 2nd ch from hook, sc in each ch, sl st into the next st] x 8. You should have one st left to work, ch5, starting in the 2nd ch from hook, sc in each ch, sl st into the last st.
FO and cut yarn, leave a tail for sewing to the body.
Make sure you have 9 feathers across the bottom of each wing.
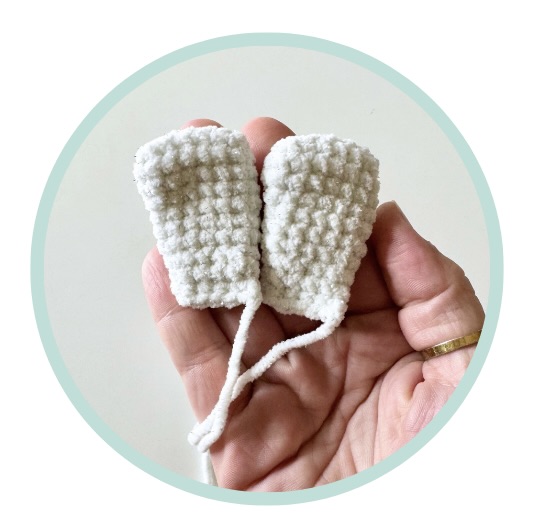
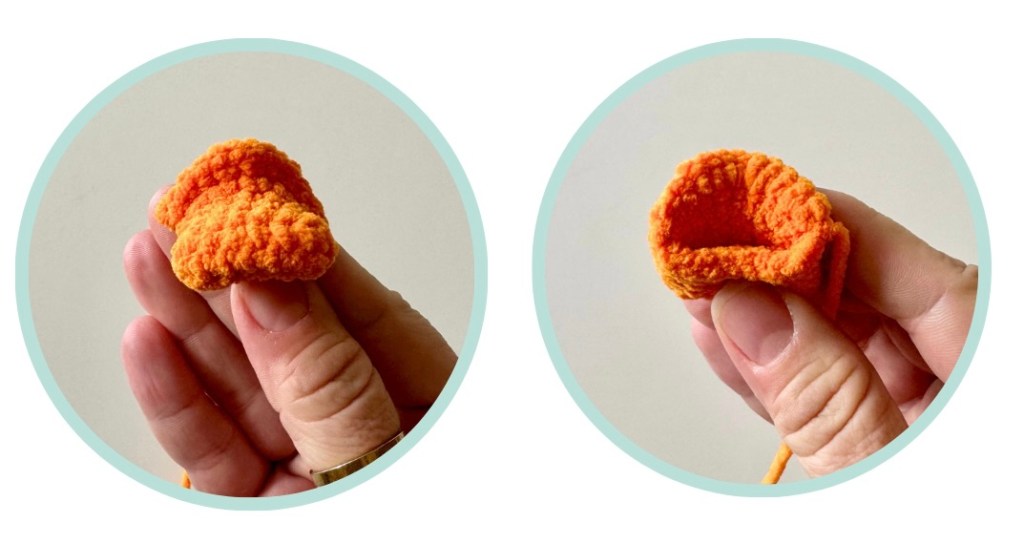
Feet x 2
Using Pumpkin
Rnd 1: Ch6, starting in the 2nd ch from hook, 5sc across through the back humps. (10) Both sides of the foundation row are counted as sts.
Rnd 2: Work in the next available st, on the opposite side of the piece, inc, 4sc, continue working around, inc, 4sc (12)
Rnd 3: sc in each st (12)
Rnd 4: 10sc, dec (11)
Rnd 5: sc in each st (11)
Rnd 6: 2sc, ch4, skip4, 5sc (11)
Rnd 7: 9sc, dec (10) You will work through the back humps of the ch sts.
Rnd 8: dec x 5 (5)
Sl st into the next st to FO and cut yarn. Weave your tail through FLO of the remaining 5 sts, pull to close and hide the ends inside of the feet. Stuff the feet lightly.
Legs x 2
We will be adding the leg to the foot, in the skipped sts from Rnd 6.
Starting with Pumpkin
Rnd 1: With a sl knot on you hook and the toe of the foot facing away from you, sc in the farthest st to the left, on the back of the foot. sc in each of the 7 sts (8) PM.
Rnd 2-3: (2 rnds) sc in each st (8)
Change to Ice Bear Sparkle
Rnd 4: inc x 8 (16)
Rnd 5: [3sc, inc] x 4 (20)
Rnd 6: sc in each st (20)
Sl st into the next st to FO. Cut yarn and leave a tail for sewing to the body. Stuff the legs.
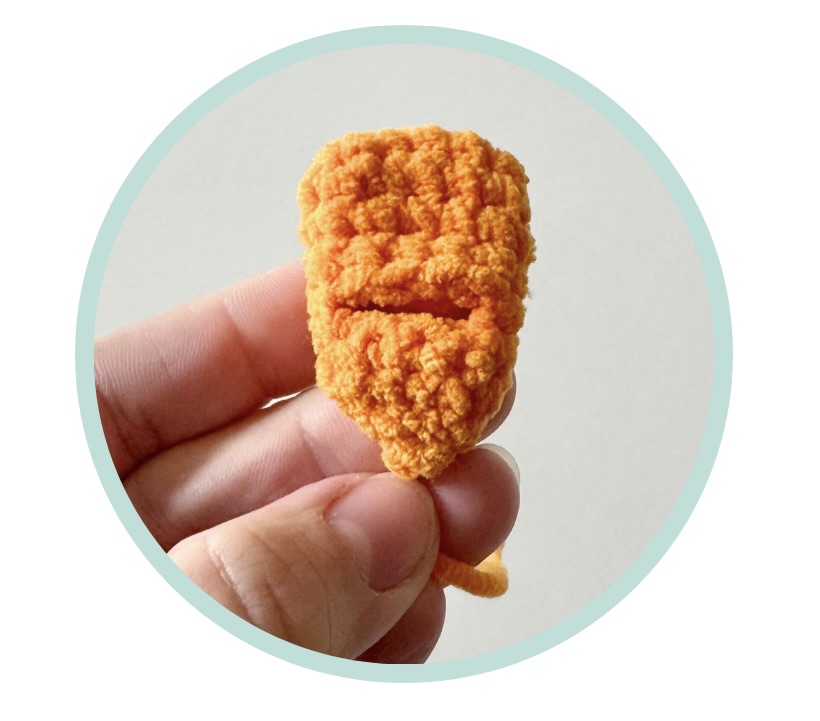
Beak
Using Pumpkin
Rnd 1: Ch7, starting in the 2nd ch from hook, 6sc across through the back humps. (6)
Rnd 2: Work in the next available st, on the opposite side of the piece, inc, 5sc, continue working around, inc, 5sc (14)
Rnd 3-5: (3 rnds) sc in each st (14)
Rnd 6: 3sc, inc, hdcinc x 2, inc, 3sc, 4sl st (18)
Rnd 7: sl st, 4sc, inc x 3, 3sc, sl st (12) Leave the remaining 6 sts unworked.
FO. Cut yarn and leave a tail for sewing. Do not stuff the beak.
Head
Using Ice Bear Sparkle
Rnd 1: 6sc in a MR (6)
Rnd 2: inc x 6 (12)
Rnd 3: [sc, inc] x 6 (18)
Rnd 4: [sc, inc, sc] x 6 (24)
Rnd 5: [3sc, inc] x 6 (30)
Rnd 6-7: (2 rnds) sc in each st (30)
Rnd 8: [9sc, inc] x 3 (33)
Rnd 9-10: (2 rnds) sc in each st (33)
Rnd 11: [5sc, inc, 5sc] x 3 (36)
Rnd 12-13: (2 rnds) sc in each st (36)
Rnd 14: [11sc, inc] x 3 (39)
Rnd 15-16: (2 rnds) sc in each st (39)
Rnd 17: [6sc, inc, 6sc] x 3 (42)
Change to Cherry Sparkle
Rnd 18-19: (2 rnds) sc in each st (42)
Change to Pickle Sparkle
Rnd 20: [sc, spike st] x 21 (42)
Change to Cherry Sparkle
Rnd 21-22: (2 rnds) sc in each st (42)
Change to Pickle Sparkle
Rnd 23: [spike st, sc] x 21 (42)
Change Cherry Sparkle
Rnd 24: sc in each st (42)
Body
Change to Ice Bear Sparkle
Rnd 25: Ch5, starting in the 2nd ch from hook, sc in each ch through the back humps, 15sc, [inc, 2sc] x 4, 15sc (54) PM. Each side of the tail counts as sts.

Rnd 26: 2sc, [inc] x 4, 18sc, [inc, 3sc] x 4, 14sc (62)
Rnd 27: 2sc, [sc, inc] x 4, 52sc (66)
Rnd 28: 2sc, [2sc, inc] x 4, 52sc (70)
Rnd 29: sc in each st (70)
Rnd 30: Adding the tail feathers. 4sc, 5sc through 1st tail and body, sc, 5sc through 2nd tail and body, 55sc (70)
Rnd 31-34: (4 rnds) sc in each st (70)
Rnd 35: [5sc, dec] x 10 (60)
Rnd 36-37: sc in each st (60)
Rnd 38: [2sc, dec, 2sc] x 10 (50)
Rnd 39: sc in each st (50)
Rnd 40: [4sc, dec, 4sc] x 5 (45)
Rnd 41: [7sc, dec] x 5 (40)
Rnd 42: [3sc, dec, 3sc] x 5 (35)
Add the stuffing, continue stuffing until the last rnd.
Rnd 43: [5sc, dec] x 5 (30)
Rnd 44: [3sc, dec] x 6 (24)
Rnd 45: [sc, dec, sc] x 6 (18)
Rnd 46: [sc, dec] x 6 (12)
Rnd 47: dec x 6 (6)
Sl st into the next st to FO. Weave your tail through FLO of the remaining 6 stitches, pull to close and hide the ends inside of the body.
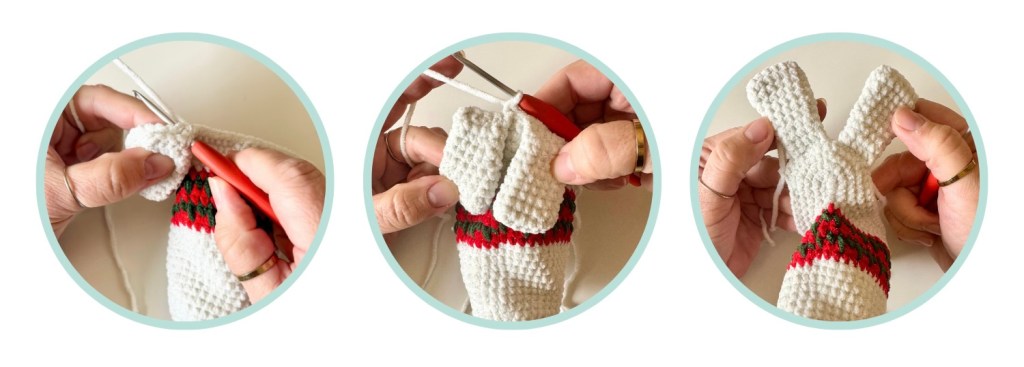
Hat
Starting with Pickle Sparkle
Rnd 1: 5sc in a MR (5)
Rnd 2: inc x 5 (10)
Rnd 3: sc in each st (10)
Stuff lightly.
Rnd 4: dec x 5 (5)
Change to Cherry Sparkle
Rnd 5: sc in each st (5)
Rnd 6: 4sc, inc (6)
Rnd 7: [2sc, inc] x 2 (8)
Rnd 8: [3sc, inc] x 2 (10)
Rnd 9: [4sc, inc] x 2 (12)
Rnd 10: sc in each st (12)
Rnd 11: [3sc, inc] x 3 (15)
Rnd 12: sc in each st (15)
Rnd 13: [4sc, inc] x 3 (18)
Rnd 14: sc in each st (18)
Rnd 15: [5sc, inc] x 3 (21)
Rnd 16: sc in each st (21)
Rnd 17: [6sc, inc] x 3 (24)
Rnd 18: sc in each st (24)
Rnd 19: [7sc, inc] x 3 (27)
Rnd 20: sc in each st (27)
Rnd 21: [4sc, inc, 4sc] x 3 (30)
Rnd 22: sc in each st (30)
Rnd 23: [9sc, inc] x 3 (33)
Rnd 24: [5sc, inc, 5sc] x 3 (36)
Rnd 25: [11sc, inc] x 3 (39)
Rnd 26-40: (15 rnds) sc in each st (39)
Rnd 41: [6sc, inc, 6sc] x 3 (42)
Rnd 42-43: (2 rnds) sc in each st (42)
Sl st into the next st to FO and cut yarn. Leave a long tail for sewing.
Assembly
Use T-Pins to hold all pieces in place while sewing. Consider pinning all pieces before sewing to best visualize where you want your placement to be.
- Sew the beak, centered on the head, over Rnds 12-16. Use the tail for reference on centering the beak.
- Embroider the eyes over Rnds 11-13 on either side of the beak. Reference video below.
- Sew the wings to either side of the body over Rnds 25-32.
- Sew the legs to either side of the body over ends 35-40. I left ~10 sts between the two legs.
- Sew the hat to the head with Rnds 9 of the face showing at the top of the head.
Congratulations! You have finished your Christmas Duck! I hope you loved making Juniper Frost as much as I loved making her for you!
This post may contain affiliate links that help me support my family, and bring you more free patterns, like this, at no extra cost to you!
Discover more from SarahDee Crochet
Subscribe to get the latest posts sent to your email.

