Created by DreamingPandaCreations
Level – Adventurous Beginner

I hope you enjoy making your very own superhero bear, please tag me @dreamingpandacreations in your photos so I can see!
I am Emily, from sunny Queensland! I started crocheting a few years ago, as I needed a hobby that didn’t involve a screen! I remember trying to learn how to make a granny square on YouTube, and being so very confused as to why my square only had three sides…
Needless to say I have come a long way since then! Haven is my 3rd amigurumi pattern, and only my 4th pattern overall.

My motto is ‘follow the joy’ so I am always making something cute with my crochet hook, as bringing a little character to life brings me so much joy!
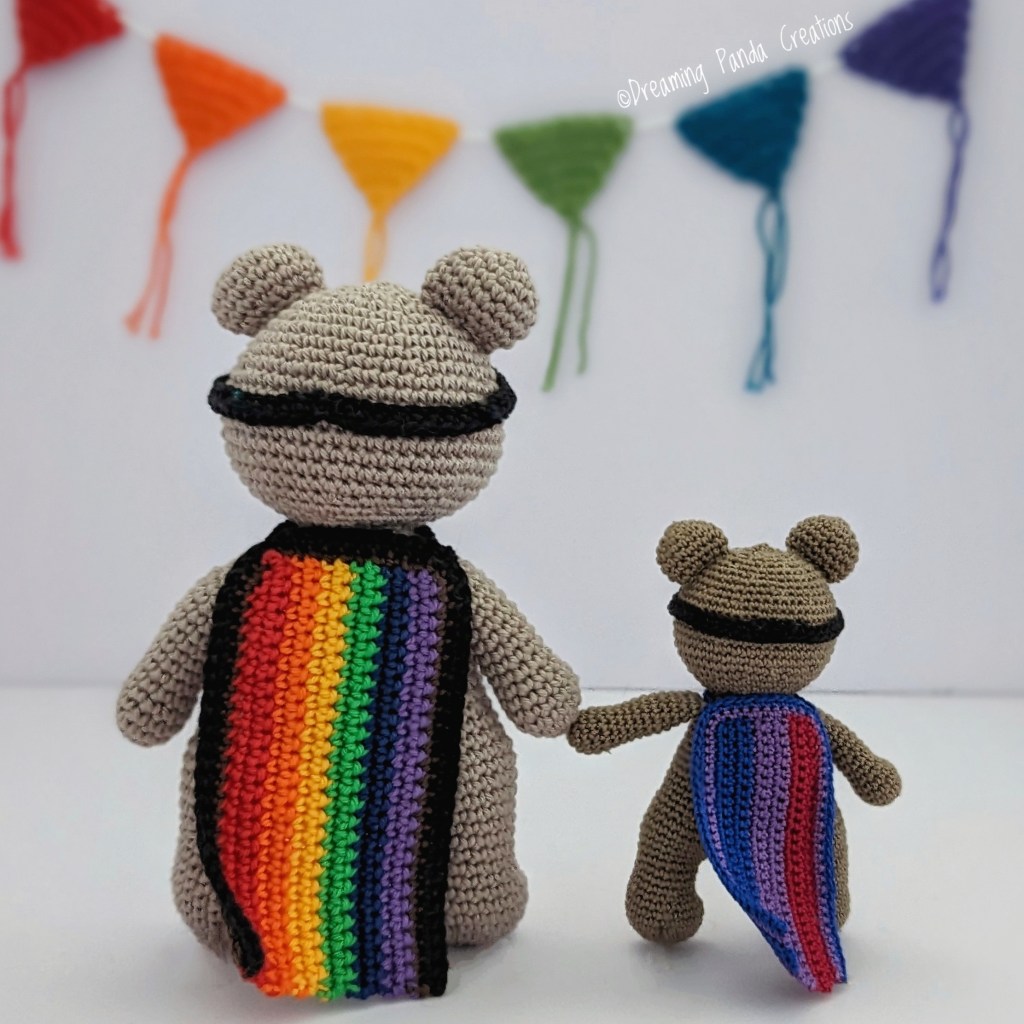
When I had the chance to design something for Pride Month, I had the idea of creating something that could almost be a mascot for the queer community. I eventually landed on a superhero – because I think we need some more magic and safety in our lives.
Haven means ‘safety and security’ which felt like the perfect name for this cute bear, even if it isn’t the most ‘superhero-y’ name ever!
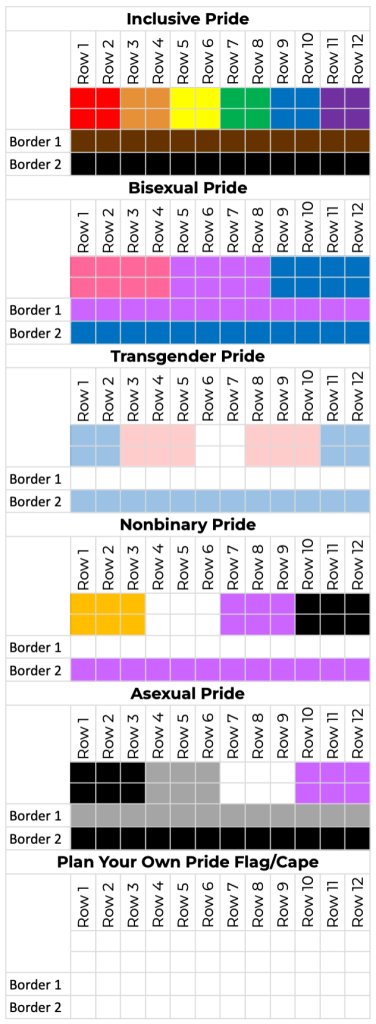
You will be able to customise the cape with your own pride flag colours, I have included instructions for a few common ones, as well as a ‘build-your-own’ chart.
Haven’s cape requires some colour work, ensure you always change colours in the last stitch of the previous colour or your finished product may not look correct.
Follow Emily!
You can also find an ad-free PDF of this pattern here:
Legal
Copyright 2023 Dreaming Panda Creations. This pattern is for personal use only. You may sell the items that you make from this pattern, but I ask that you refer back to ©️DreamingPandaCreations as the designer. Altering, reproducing, or selling this pattern, online or in print is strictly prohibited. This pattern is protected by international copyright laws.
Materials
- Yarn in; chosen colour for your bear, colours required for your chosen pride flag
- Crochet hook appropriate to your yarn
- Wool Needle
- Scissors
- Stitch Marker
- Embroidery thread for eyes in black and white or safety eyes
Abbreviations
ch – chain stitches
slst – slip stitch
hdc – half-double crochet
inc – increase, two sc into one stitch
dec – decrease, sc two stitches together
3scinc – three sc into one stitch
dc – double crochet
dcinc – double crochet increase, two dc into one stitch
3dcinc – three dc into one stitch
BLO – back loops only
FO – fasten off
(…) x6 – repeat instructions between the () 6 times
*…* – complete actions between the () in the same stitch
[..] – Stitch count
Pattern
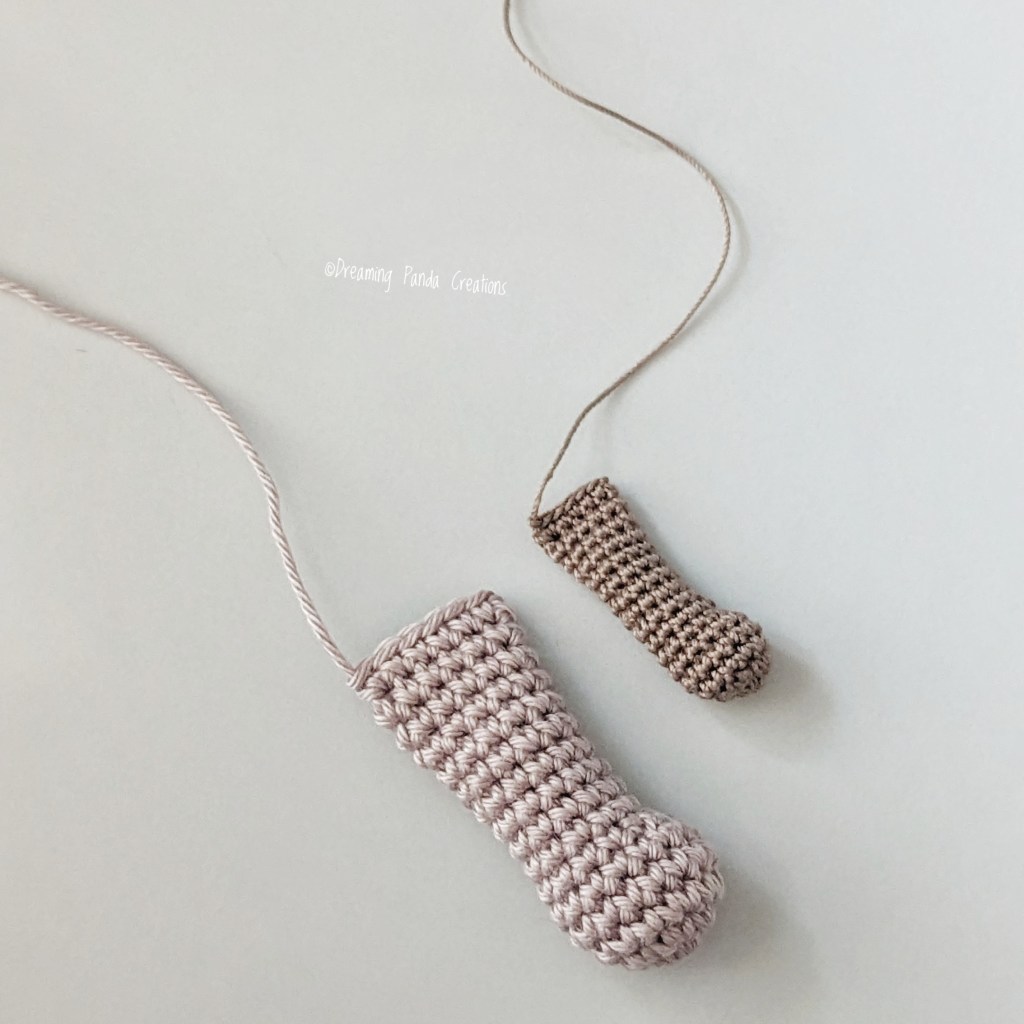
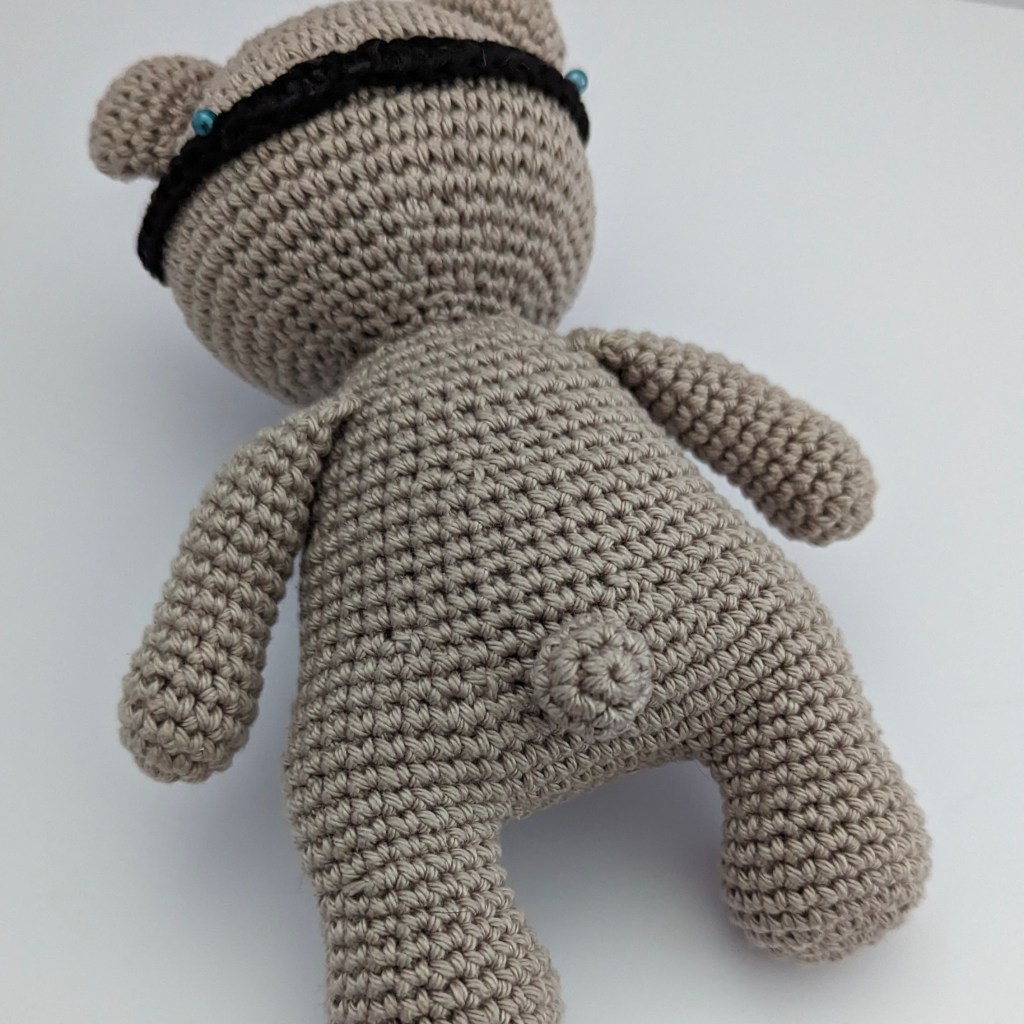
Arms x 2
In bear color.
Round 1: 6sc in a MR [6]
Round 2: (inc) x6 [12]
Round 3: (inc) x3, 9sc [15]
Round 4-5: 15sc [15]
Round 6: (dec) x3, 9sc [12]
Round 7-15: 12sc [12]
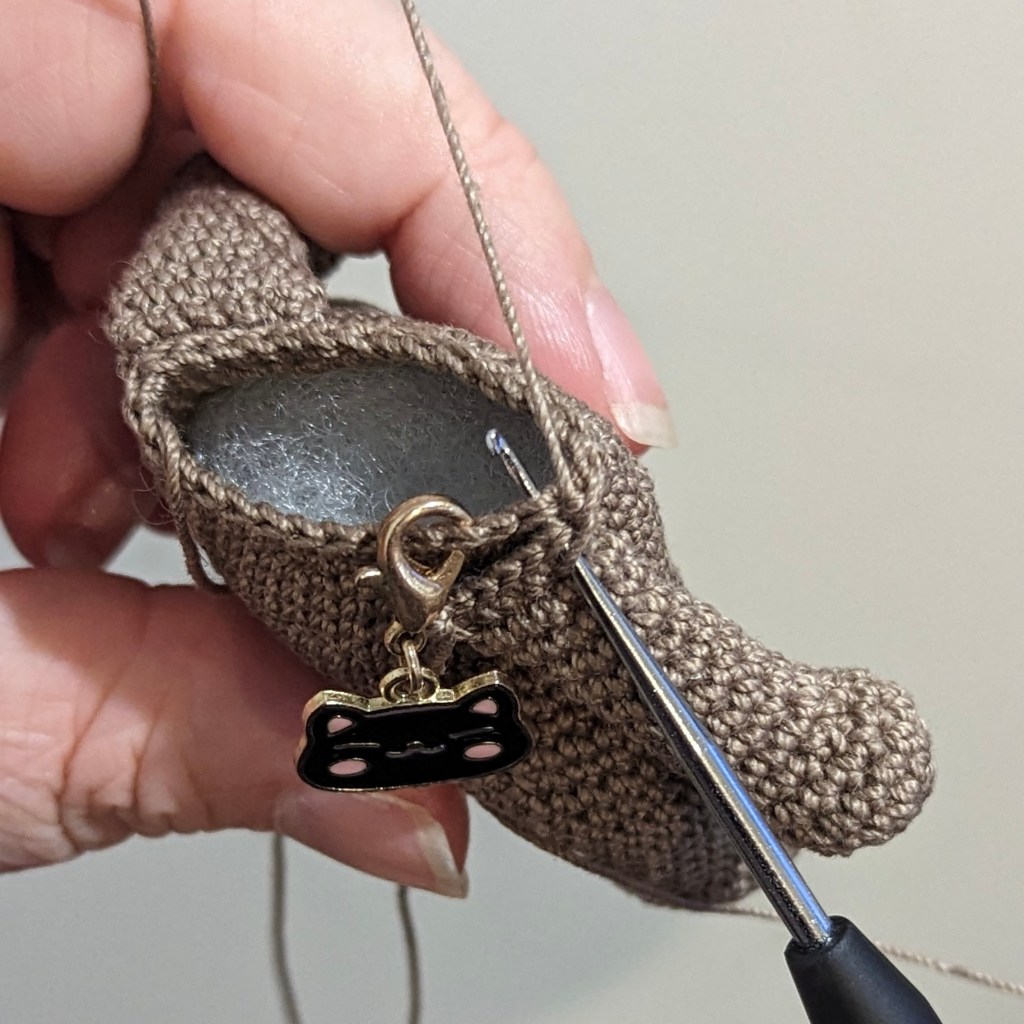
Stuff ‘hands’ firmly. Stuff arm loosely, leaving the top half unstuffed. Fold in half, and crochet 6sc through both layers to close. Leave a small tail to weave in ends, as we will be crocheting them onto the body. If you prefer to sew them on, leave a long tail.
Tip: the increases and decreases will have created a little “thumb”. When crocheting closed, ensure the thumb is on an outside edge, and NOT along the flat side.
Legs x 2
In bear color.
Round 1: 6sc in a MR [6]
Round 2: (inc) x6 [12]
Round 3: (sc, inc) x6 [18]
Round 4: (inc, 2sc) x6 [24]
Round 5-7: 24sc [24]
Round 8: 7sc, (sc, dec) x3, 8sc [21]
Round 9: 7sc, (dec) x3, 8sc [18]
Round 10-12: 18sc [18]
Stuff firmly. FO and weave in ends on the first leg only, you will move onto the body from the end of the second leg.

Continuing in bear colour from the second leg.
Pay close attention to where you are joining the legs, and make sure the toes are pointing the right way. I like to have mine point inwards a little. You may need to crochet a few stitches to move the chains where you want them, ensure you are keeping the round marker where you started the round.
We will be crocheting the arms into the body as we go. To do this, you will hold the arm to the body and work through both layers of fabric (the arm and the body) when I say ‘in arm’. Ignore this if you prefer to sew them on afterwards.

Round 13: 4sc, 9ch, insert hook into the first leg to join and sc in all 18 stitches, 9sc into the chain, 14sc [54]
Round 14-18: 54sc [54]
Round 19: (7sc, dec) x6 [48]
Round 20: 48sc [48]
Round 21: (6sc, dec) x6 [42]
Round 22-26: 42sc [42]
Round 27: (5sc, dec) x6 [36]
Start stuffing the body, and continue stuffing as you go.
Round 28-30: 36sc [36]
Round 31: (4sc, dec) x6 [30]
Round 32: 11sc, 6sc in arm, 10sc, 3sc in arm [30]
Round 33: 3sc in arm, dec in last stitch of arm and next stitch of the body, (3sc, dec) x5 [24]
Tip: If your end of round doesn’t line up perfectly you may need to adjust your stitches so the arms are on the sides of the body
Round 34: 24sc [24]

Stuff firmly. FO and weave in ends. If you prefer to not sew the head to the body, do not FO and continue from the body, starting with round 23 of the head, and reversing the instructions (replace dec with inc and so on). You may wish to make a few sc stitches to move the beginning of the round to the middle of the neck/head.
Note; you skip round 24 to account for the neck height you would lose when sewing the pieces together.
Head
In bear color.
Round 1: 6sc in a MR [6]
Round 2: (inc) x6 [12]
Round 3: (sc, inc) x6 [18]
Round 4: (2sc, inc) x6 [24]
Round 5: (3sc, inc) x6 [30]
Round 6: (4sc, inc) x6 [36]
Round 7: (5sc, inc) x6 [42]
Round 8-9: 42sc [42]
Round 10: (6sc, inc) x6 [48]
Round 11: (7sc, inc) x6 [54]
Round 12-18: 54sc [54]
Round 19: (7sc, dec) x6 [48]
Round 20: (6sc, dec) x6 [42]
Round 21: (5sc, dec) x6 [36]
Round 22: (4sc, dec) x6 [30]
Round 23: (3sc, dec) x6 [24]
Round 24: 24sc [24]
Stuff firmly. FO and leave a long tail for attaching to the body.

Muzzle
In bear color.
Round 1: 6sc in a MR [6]
Round 2: (inc) x6 [12]
Round 3: (sc, inc) x6 [18]
Round 4: (inc, 2sc) x6 [24]
Round 5-7: 24sc [24]
FO with an invisible join and leave a long tail for attaching to the head.
Ears x 2
In bear color.
Round 1: 6sc in a MR [6]
Round 2: (inc) x6 [12]
Round 3: (sc, inc) x6 [18]
Round 4-6: 18sc [18]
Round 7: (sc, dec) x6 [12]
FO and leave a long tail for sewing.
Tail
In bear color.
Round 1: 6sc in a MR [6]
Round 2: (inc) x6 [12]
Round 3: 12sc [12]
Round 4: (sc, dec) x4 [8]
FO and leave a long tail for sewing.
Mask
In black.
Row 1: Ch57 [57]
Row 2: Starting in the second chain from the hook, 18sc, ch7, skip 7 stitches, 6sc, ch7, skip 7 stitches, 18sc [56]
Tip: crochet your chain stitches loosely so they don’t curl. FO and leave a long tail for sewing.

Cape
The cape has been designed to capture the essence of a Pride flag, it may not be an exact copy.
Use the colour charts below to know what colour to work your rows in, I have stepped it out row-by-row below, to make it easier for you to customise your cape by writing on or highlighting your printout.
I like to crochet over my ends as I work to keep it neat and tidy.
Tip: on the very last page of the PDF pattern there is a grid where you can colour in the boxes if you want to design a more complicated cape, using pixel crochet techniques.
Tip: crochet your chain stitches loosely so they don’t curl.

Row 1: ch27, ch1, turn [27]
Row 2: Starting in the second chain from the hook, 26sc, ch1, turn [26]
Row 3-12: 26sc, ch1, turn [26]
Border 1: 26sc, 12sc across the top of the cape, 26sc back down the other side of the cape. This will leave the bottom side unworked, ch1, turn [64]
Border 2: 64sc. [64]
FO and weave in all ends.
Attach yarn in border 2 colour to the top corner of the cape and ch20. Make sure it is long enough to get around the neck. FO.
Tip: if you are going to make multiple capes, or want to be able to remove it, attach two, shorter chain lengths to both top corners and tie in the front.
Assembly
- Sew head to body
- Sew the muzzle to the centre of the face between rounds 13 and 22- stuff before closing
- Sew the ears to the top of the head between rounds 6 and 13.
- Embroider eyes between rounds 10 and 12 approx 9 stitches apart (or insert safety eyes between rounds 11 and 12)
- Add eye indents over round 11 (link to guide)
- Embroider a nose onto the muzzle
- Sew or glue the eye mask onto the head, ensuring the eyes are visible
- Sew the tail onto the centre of the back, over rounds 16-18 (adjust if needed to account for how your stuffing has shaped him)
- Attach the cape around the neck and weave in ends

Cape Color Charts
You can use the charts below to create the flag/cape you prefer or use the blank chart to colour in your own rows and borders to design your own or to create a flag I haven’t generated already.
If you have a particularly complicated flag, the last page of this pattern is a full, 12 row x 26 stitch chart you can use to design, if you are confident in colour changing.

I would love to see your finished Haven! Especially if snapped at a Pride event! Please tag me @dreamingpandacreations in any photos you upload!
If you have any questions, comments, or feedback please do not hesitate to drop me a message on Instagram or Etsy, or shoot me an e-mail at dreamingpandacreations@gmail.com. I will get back to you as fast as possible!
Also thank you very much to my pattern testers! I could not have done this without you!