

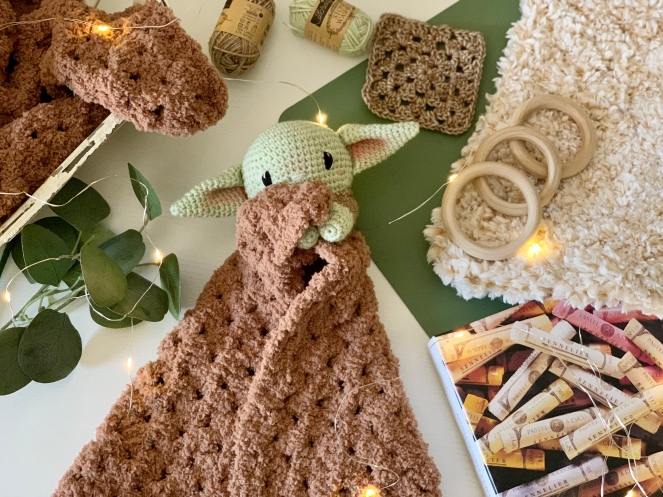
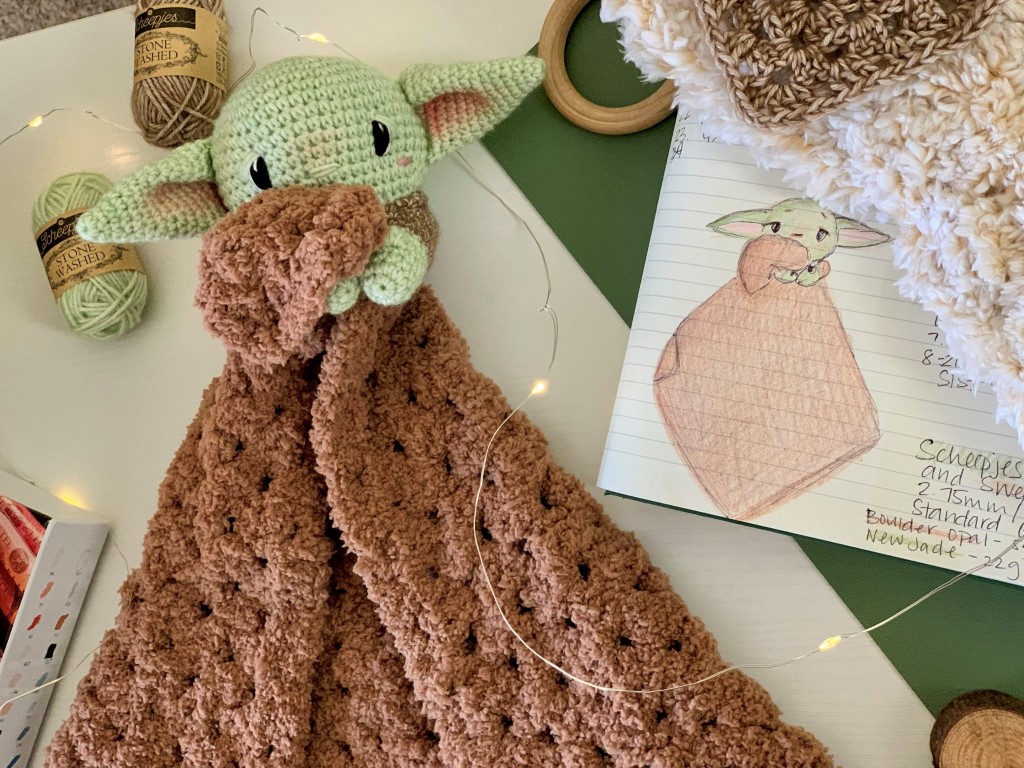
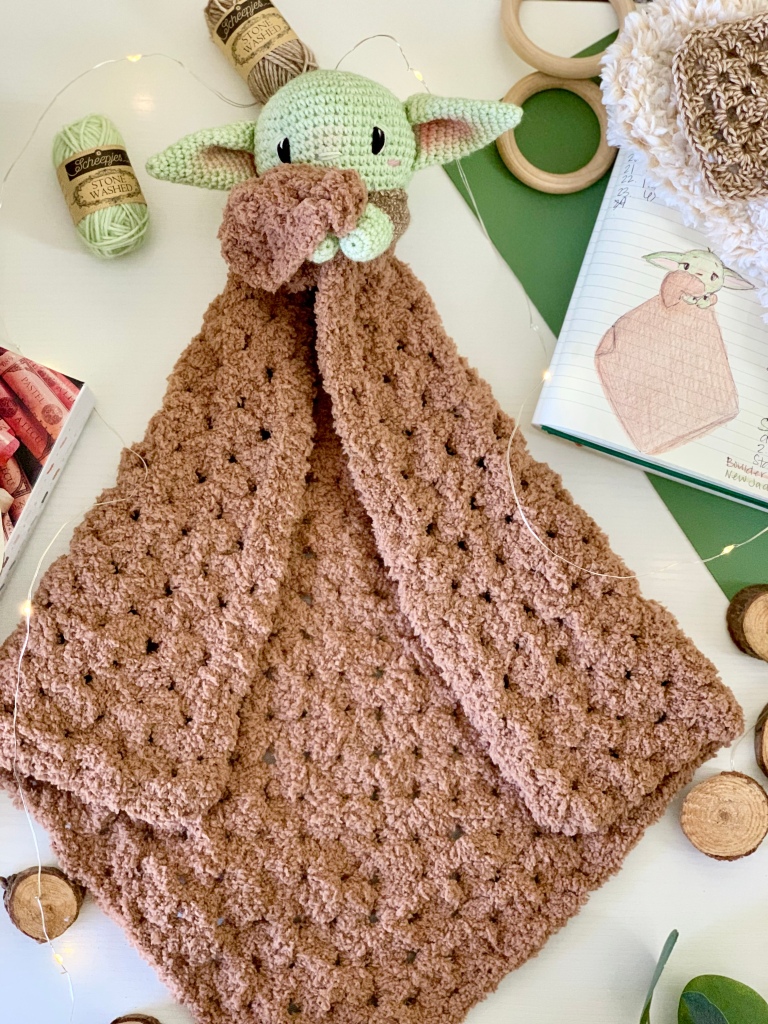
Baby aliens have always been a part of pop culture. From small children to grown adults, there is a soft spot for this baby alien, in particular. “Yoyo” is a sweet snuggly amigurumi alien, attached to a standard granny square blanket. Perfect for teaching new babies to cuddle, bringing comfort and sweet dreams. A perfect gift for a mom-to-be, or a family with a new baby!
My two youngest boys both had lovies when they were babies. They both still sleep with them in their beds because it is an item that brings them comfort and memories of love! Not to get too mushy, but my boys absolutely love any and all handmade items. I am sure your lucky little one will adore this baby alien for years to come!
“Truly wonderful, the heart of a child is.”
Master Yoda
When I first posted this lovey pattern to my Instagram stories, I had a very busy day responding to wonderful messages and feedback. It made my heart so happy! Then I went to bed and HOLY MOLY, when I woke up I had an inbox overflowing with love and ultimately a strong collective curiosity if I would be bringing this sweet alien to your hands. I knew with that overwhelming popularity of this lovey, I HAD to write up the pattern.
Also, we are all needing a little virtual pick-me-up and a crochet hug, so I hope you enjoy this free pattern from me to you!
Please let me know if you have any questions! I am here to help you!
Confession time – I did not have this pattern tested, so if you find a silly mistake, don’t be afraid to let me know! Happy crocheting my talented friends!
I love to see your work! so please, don’t forget to tag me and use #sarahdeecrochet in all of your postings!
Abbreviations
Rnd – round
chX – chain X amount of stitches
MR – magic adjustable ring
st(s) – stitch(es)
sl st – slip stitch
sp – space
sc – single crochet
dc – double crochet
dec – invisible decrease
inc – 2 sc in same stitch
FLO – front loop only
5dc-bobble – dc5tog – Yarn over, insert hook into stitch, yarn over and pull through (3 loops on hook), yarn over and pull through 2 loops. Leave the remaining loops on hook. Repeat the previous step four more times so that you have five half-complete dc stitches worked into the same stitch. There will be six loops on the hook. Yarn over and pull through all loops. This closes your 5dc-bobble crochet stitch. Do not ch. 1
There is a video tutorial to help you sew your lovey together available on my YouTube channel! Check out my Instagram reels for embroidery and sewing tips!
Materials
- 2.75mm/6mm crochet hooks
- Stitch marker
- Scissors
- Tapestry needle
- Yarn
- Fiberfill
- Black, white and pink embroidery thread or yarn
Notes
The pattern is in US terminology. The alien head is made in continuous rounds. Take care to always move up the stitch marker to the last stitch, at the end of each round. Stitch count is in ( ) at the end of each row. Make sure to have the correct number of stitches before moving on to the next round.
If you are using safety eyes, please include safety warnings for children under 3.
Yarn Used
Scheepjes Stonewashed (Sport/DK Weight) New Jade(22g) Boulder Opal(5g)
Scheephes Sweetheart Soft – Color 06(100g)
Legal
This pattern is for personal use only. You may sell the items that you make from this pattern, but I ask that you please refer back to ©️SarahDeeCrochet as the designer.
Altering, reproducing, or selling this pattern, online or in print is strictly prohibited. This pattern is protected by international copyright laws.
Alright, let’s get started!
Head
Using New Jade
Rnd 1: 6sc in a MR (6)
Rnd 2: inc x 6 (12)
Rnd 3: [sc, inc] x 6 (18)
Rnd 4: [2sc, inc] x 6 (24)
Rnd 5: [3sc, inc] x 6 (30)
Rnd 6: [4sc, inc] x 6 (36)
Rnd 7: [5sc, inc] x 6 (42)
Rnd 8: [6sc, inc] x 6 (48)
Rnd 9-16: sc in each st (48)
Rnd 17: [6sc, dec] x 6 (42)
Rnd 18: [5sc, dec] x 6 (36)
Rnd 19: [4sc, dec] x 6 (30)
Stuff the head firmly. Continue stuffing until the last rnd.
Rnd 20: [3sc, dec] x 6 (24)
Rnd 21: [2sc, dec] x 6 (18)
Rnd 22: [sc, dec] x 6 (12)
Rnd 23: dec x 6 (6)
Slst into the next st to FO. Leave a long tail for sewing to the blanket. Weave your needle through FLO of the remaining 6 stitches, pull to close.
Arms x 2
Using New Jade
Rnd 1: 6sc in a MR
Rnd 2: inc x 6 (12)
Rnd 3-4: sc in each st (12)
Rnd 5: 11sc, bobble (12)
Rnd 6: sc in each st (12)
Rnd 7: 6sc, change to Boulder Opal, 6sc (12)
Rnd 8-21: sc in each st (12)
Sl st into next st to FO and cut yarn. Leave a long tail for sewing to the head. Stuff the arms lightly.
Ears x 2
Using New Jade
Rnd 1: 6sc in a MR (6)
Rnd 2: sc in each st (6)
Rnd 3: [inc, sc] x 3 (9)
Rnd 4: sc in each st (9)
Rnd 5: [2sc, inc] x 3 (12)
Rnd 6: sc in each st (12)
Rnd 7: [3sc, inc] x 3 (15)
Rnd 8: sc in each st (15)
Rnd 9: [4sc, inc] x 3 (18)
Rnd 10: sc in each st (18)
Rnd 11: [5sc, inc] x 3 (21)
Rnd 12: sc in each st (21)
Rnd 13: [6sc, inc] x 3 (24)
Rnd 14: [5sc inc] x 4 (28)
Add optional pink color to the inner ears using make-up blush, wax crayons, or soft pastels.
Rnd 15: 14sc across both sides to close. Do not stuff ears. FO and snip yarn, leave a long tail for sewing. Fold the ear over and sew over 4 sts, (8 sts total) leaving 6 sts of the ear unsewn.
Blanket
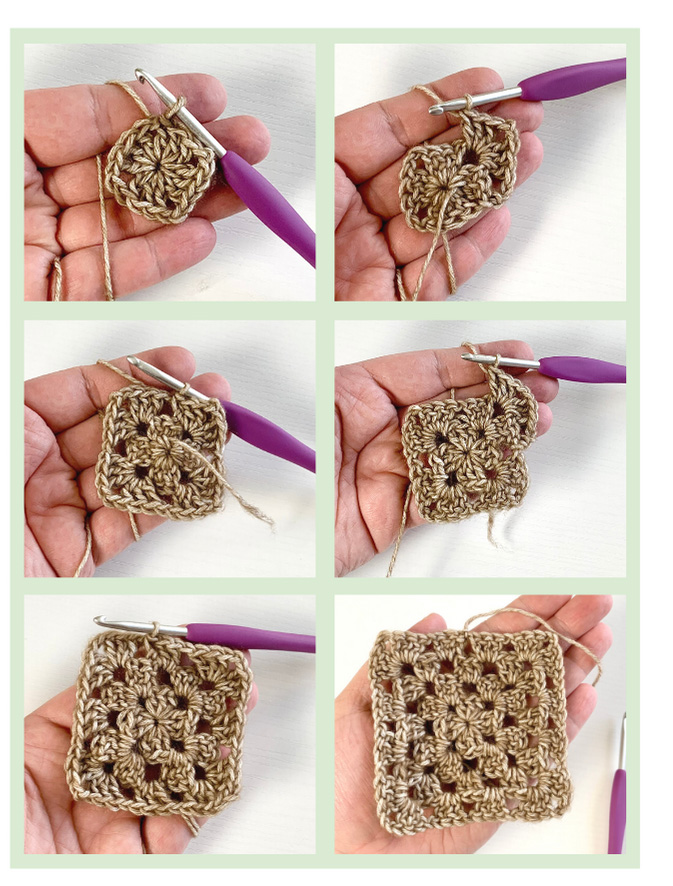
The blanket to this lovey is made using a standard granny square pattern. There are many ways to start and make a granny square, this is what I have adapted to work best for me.
Some granny squares are made with one right side and one wrong side. This means the square is not turned after every round. Other squares are made with turning after every round so there is no right side. The benefit to turning is the square will even itself out and not end up slanted to one side when finished. This leaves a cleaner-looking square. In these squares, you will not be working into the stitches of the previous round, you will be working into the ch1 or ch2 sp(corner) of the previous round. Take care to sew in your ends as you make your squares, to save yourself time when finished.
There is no gauge here, but depending on your tension, you may need to change your hook size. I used the entire skein of Sweetheart Soft, which made 14 rnds.
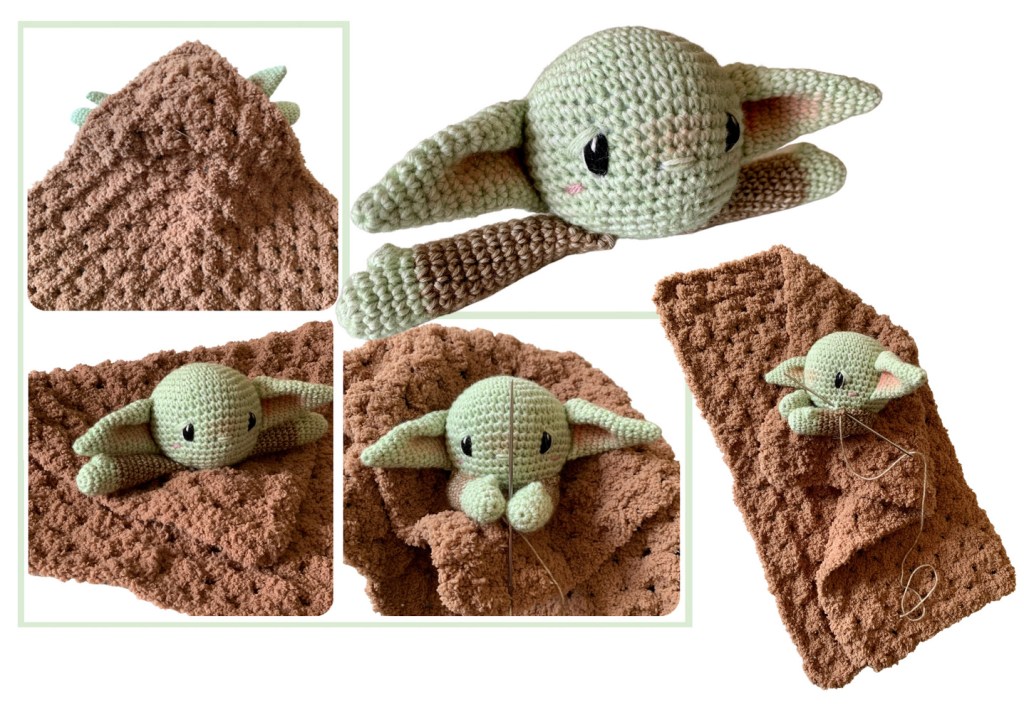
Make sure to reference the photos below, if you have never made a granny square before.
Using 6mm hook.
Start with a ch3, sl st into 3rd ch from hook to create a ring. You will be working the first round of the granny square into this ring.
Rnd 1: [everything in this round goes into ring] sc, ch3 (the ch3 counts as dc and ch2 for corner) [3dc, ch2] x 3, 2dc, slst into the first ch. You should have four 3dc-clusters and four ch2 spaces. (12)
Rnd 2: sc into corner, ch2, turn, (the ch2 counts as dc and ch1) *[3dc, ch2, 3dc] into the next corner, ch 1* repeat 2 more times, 3dc, ch2, 2dc in the next corner, join with a sl st to the first ch 1
Rnd 3: sc into space, ch2, turn, (the ch2 counts as dc and ch1) *[3dc, ch2, 3dc] in corner, ch 1, 3dc into sp, ch 1, *repeat around until last space, 2 dc, join with a sl st to the first ch 1
Rnd 4: sc into the sp, ch 2, turn, (the ch2 counts as dc and ch1) *3dc into next sp, ch 1, [3dc, ch2, 3dc] in corner, ch 1, 3dc in next sp, ch 1,* repeat around until last space, forgoing the last dc in the final sp, 2dc, join with a sl st to the first ch 1
Rnd 5 and on: Follow along in this manner. At the beginning of the round, sc, ch2 and turn, (the ch2 counts as dc and ch1) every ch1 space gets [3dc, ch 1] and every corner gets [3dc, ch2, 3dc] and then a ch 1.
When finished, FO with a sl st and sew in all ends.
Assembling the Head
Use straight pins to hold all pieces together while you sew.
First, sew the ears to the side of the head, over rnds 9-15. Make sure they line up with each other while sewing.
Sew the arms to the bottom of the head, about an inch apart. Make sure the thumb detail is facing up. Leave tails on the back of the arms for sewing to the head, after sewing the blanket to the alien.
Embroidery
Embroider the eyes over rnds 11-14. Approximately 12 sts apart. Add the eyelids using New Jade.
Embroider the nose between rnds 14 & 15, across 3 sts.
Embroider the cheeks between rnds 16 & 17, underneath the eyes.
If you are using safety eyes, please include safety warnings for children under 3.
Sewing the alien to the blanket
Sew the blanket to the alien with the arms open first. Make sure it is secure before you sew the arms together. Take care to attach the blanket to the back of the head to cover where the arms have been sewed on. Also, take care to sew the blanket securely to the arms and head so it will not move when tugged on. When the blanket is secure, use the remaining yarn to sew the arms in place along the head. Also, sew the two arms together tightly. Weave in all ends. Pull the blanket out through the arms.
Don’t forget to watch the video tutorial on how to sew your lovey together!
Congratulations! You have finished your baby alien lovey! Please don’t forget to share on your Instagram account using #sarahdeecrochet
If you like this pattern, check out others like it in my shops!
Discover more from SarahDee Crochet
Subscribe to get the latest posts sent to your email.


Where do I purchase the yarn for the yoda lovey? Making Christmas gift with it! TIA
LikeLike
What a great gift! Depending on where you are, I have a few options for you. I love to shop small businesses! I am in the USA and use http://www.dotsyarnden.com I have friends in Canada who use http://www.taemombo.com and worldwide for a larger business is http://www.woolwarehouse.com
LikeLike
How large did you make the blanket? The yarn I’m using isn’t as large so it’ll take me more than 14 rounds. Thanks! This will be a great gift for a new mom I know.
LikeLike
You can make the blanket any size, but the one in the sample is roughly 18 inches.
LikeLike
Thanks! I liked the proportions of the sample so I wanted to make sure I got it right
LikeLike
very nice pattern
LikeLike
My Granddaughter is due in November and she wanted me to make her a cow but the girl loves so much better so I decided to make this one for her. Thank you for such an wonderful pattern and I will post picture.
LikeLike
Congratulations on the new baby to come! I can’t wait to see what you make. It is sure to be loved!
xx
LikeLike