
Crochet Pattern by Jamy Lyn Art
Level – Intermediate
Hello!
I am so excited for you to make your very own Garden Party Pal! I’ve listed some suggested materials below depending on your yarn preferences. I’ve included Premier Parfait Chunky (the yarn I used throughout the pattern), Bernat Blanket, and Big Twist Value, but you can use anything you’d like! Thank you for all of your support and have fun!! I can’t wait to see your bunnies!

Follow Jamy!
Instagram
Etsy
Ravelry
Ribblr
Website
You can also find an ad-free PDF of this pattern available in Jamy’s shops!
Materials
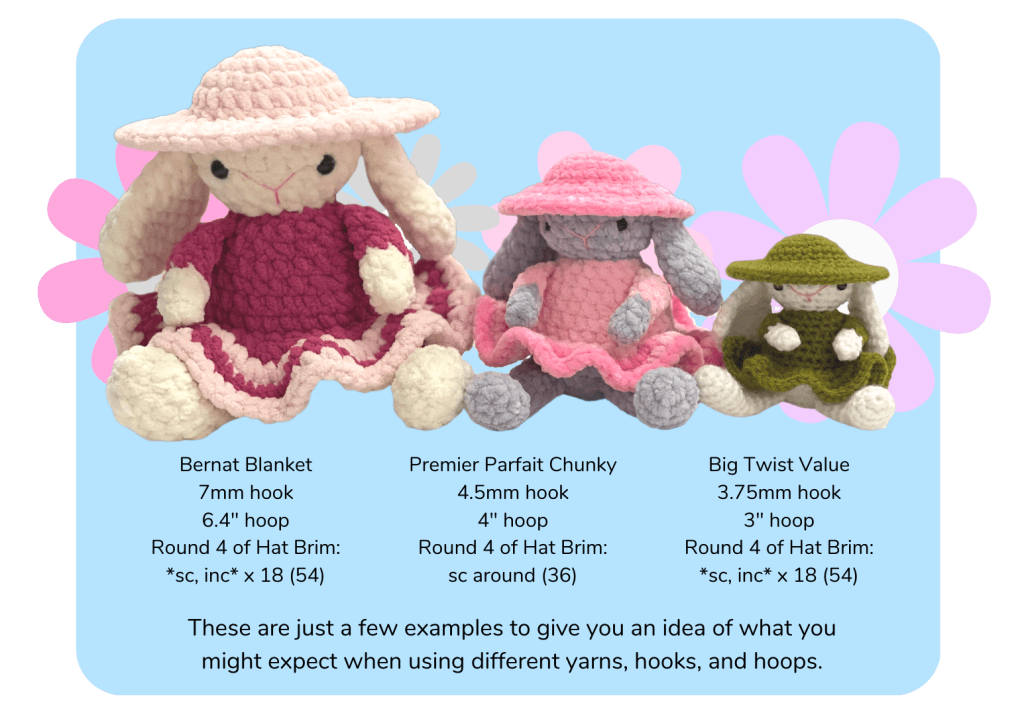
Using 4.5 mm crochet hook and Premier Parfait Chunky in 2-3 Colors
Finished size: appx. 6 inches seated
• Pink embroidery floss or Cotton Pearl for nose details
• Stitch Markers
• Darning needle
• Scissors
• Poly-fil
• 8 mm safety eyes
• 4″ macrame hoop
Using 7mm crochet hook and Bernat Blanket/Baby Blanket in 2-3 Colors
Finished size: appx. 9 inches seated
• Pink embroidery floss or Cotton Pearl for nose details
• Stitch Markers
• Darning needle
• Scissors
• Poly-fil
• 12 mm safety eyes
• 5.5″-6.5″ macrame hoop
Using 3.75 mm crochet hook and Big Twist Value in 2-3 Colors
Finished size: appx. 4 inches seated
• Pink embroidery floss or Cotton Pearl for nose details
• Stitch Markers
• Darning needle
• Scissors
• Poly-fil
• 6 mm safety eyes
• 3″-4″ macrame hoop
Optional Materials : Straight pins to hold pieces in place while sewing.
Abbreviations
• Rd/Rds – round/rounds
• MR – magic ring
• st/sts – stitch/stitches
• ch – chain
• sl st – slip stitch
• sc – single crochet
• BLO – back loop(s) only
• FLO – front loop(s) only
• (…) – end of row stitch count
• *…* – denotes a repeated stitch pattern
• inc – increase (two single crochets in the same stitch)
• dec – decrease (insert hook into the front loops of the next 2 stitches and complete a sc)
• invisible join – cut yarn and pull the loose strand through the top of the stitch. Thread the yarn onto a darning needle and, from front to back, go under both loops of the 2nd stitch of the round. Now, from top to bottom, go back down through the top of the stitch you started in and pull the yarn through the back of your work. Weave end. This creates the look of a false stitch on top of the first stitch of the round, disguising the end of the round and creating a seamless look.
Before you begin
Please read through the entire pattern to familiarize yourself with the steps.
This pattern is worked in continuous rounds.
Color A – Fur
Color B – Hat & Skirt
Color C – Upper Body, Sleeves, & Skirt
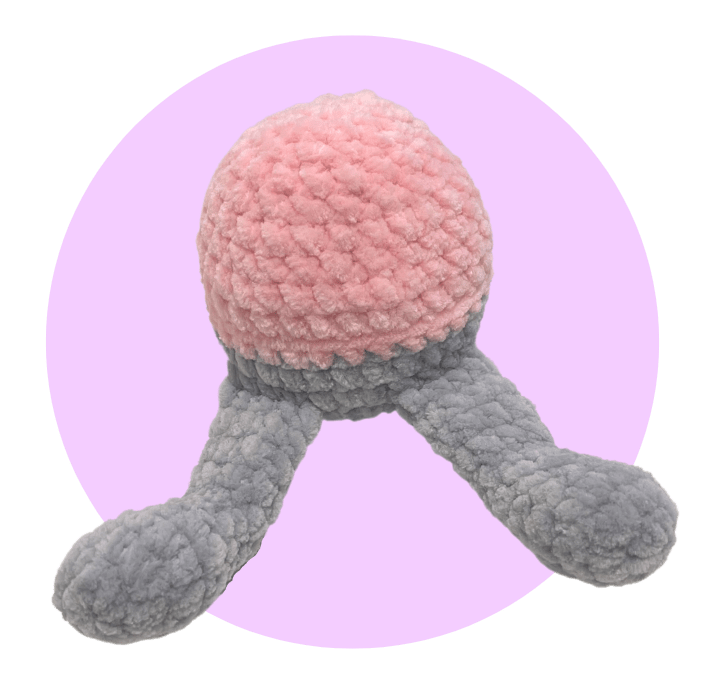
I’ve created this pattern with minimal sewing (yay!): The Ears and Legs are no-sew, the Hat Brim and Skirt are worked onto the Head and Body, respectively. The Head and Arms are sewn to the Body.
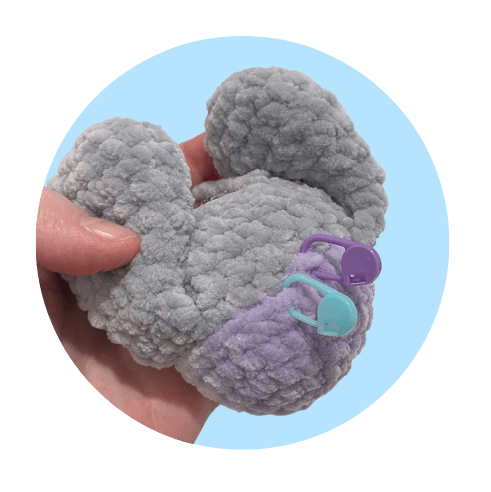
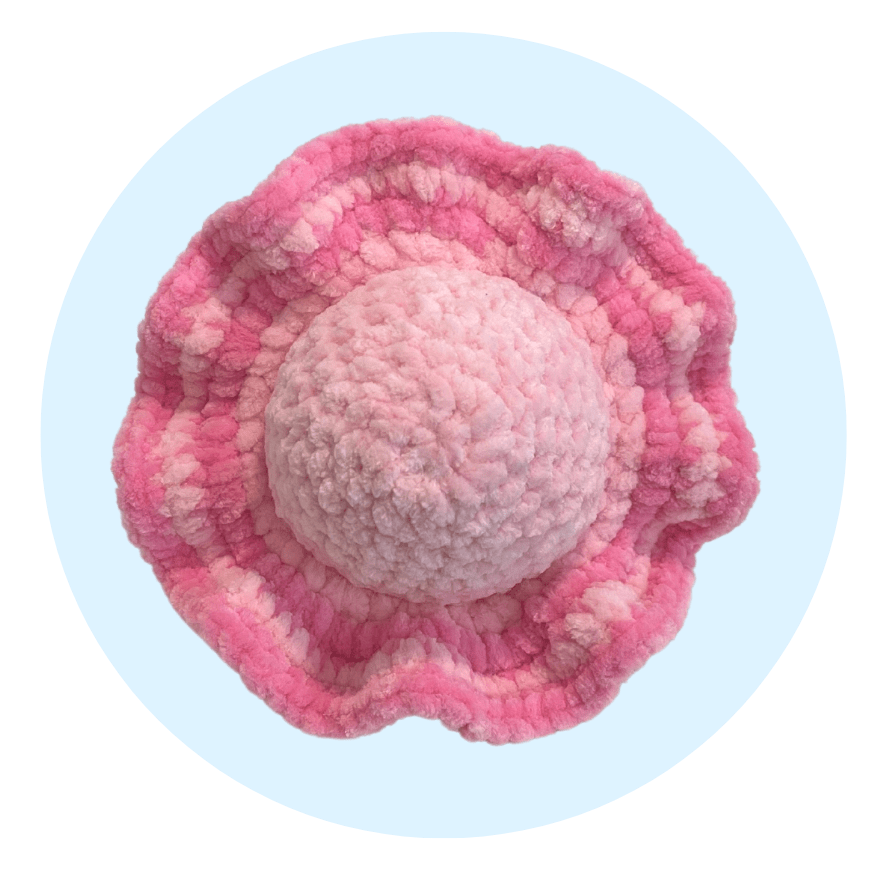
Important note about hoop sizing: I have done my best to provide accurate sizes, but due to tension differences, you may need to adjust your hoop size and/or hook size. The sizes listed are suggestions based on the experiences of myself and my testers.
Ideally, your hoop should be only slightly larger than the completed round 3 of your Hat Brim. You want your yarn in round 4 (the round where you add the hoop) to be stretched enough so that the Hat Brim is flat, or slightly dipping down, but doesn’t pop up. Certain yarns can tolerate more stretch than others so some trial and error may be needed to find the right combination of yarn, hook, and hoop. This may sound complicated, but it’s easier than you think once you get crocheting! See examples below.
If you get stuck on any part of this pattern or have any questions, please feel free to reach out via Etsy, Ravelry, Instagram, or jamylynart@gmail.com.
If you would like to sell items made from this pattern, please do. I would appreciate any credit for the pattern given to me (Jamy Lyn Art). Do not sell, copy, or redistribute any portions of this pattern.
Let’s get started!
Ears
make 2 with color A
Rd 1: sc 6 in MR (6)
Rd 2: *inc* x 6 (12)
Rd 3: *sc, inc* x 6 (18)
Rd 4: sc around (18)
Rd 5: *dec, sc 7* x 2 (16)
Rd 6: *dec, sc 6* x 2 (14)
Rd 7: *dec, sc 5* x 2 (12)
Rd 8: *dec, sc 4* x 2 (10)
Rd 9: *dec, sc 3* x 2 (8)
Do not stuff. Fold ear in half and sc 4 across the top, going through both sides and closing the ear. Fasten off, leaving a short tail.
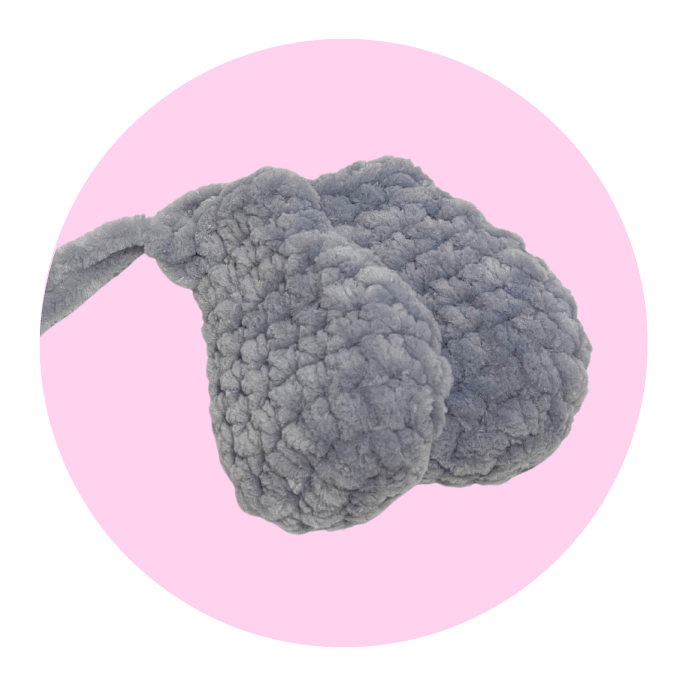
Feet/Legs
make 2 with color A
Rd 1: sc 6 in MR (6)
Rd 2: *inc* x 6 (12)
Rds 3 & 4: sc around (12)
Rd 5: *sc, dec* x 4 (8)
Rd 6: sc around (8)
Rds 7 & 8: sl st 4, sc 4 (8)
Rds 9-11: sc around (8)
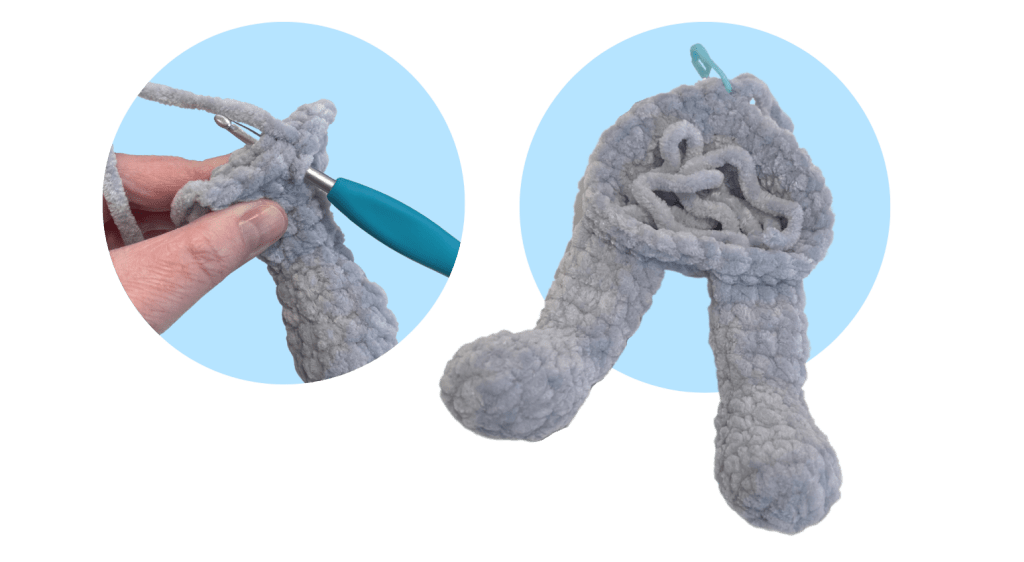
Stuff the Foot firmly, but leave the Leg unstuffed. Fold Leg in half and sc 4 across the top, going through both sides and closing the Leg. Fasten off, leaving a short tail. You may need to add or subtract a stitch or two so that the Leg is not twisted and the Foot is pointing up when doing this last step.
Tip: the sl sts in rounds 7 & 8 of the Feet/Legs count as sts. Do not work them too tightly or it may be difficult to work into them in following rounds.

Head
with color B
Tip: Work over the Ear tails when you add them, leaving them inside the Head.
Rd 1: sc 6 in MR (6)
Rd 2: *inc* x 6 (12)
Rd 3: *sc, inc* x 6 (18)
Rd 4: *sc 2, inc* x 6 (24)
Rds 5 & 6: sc around (24)
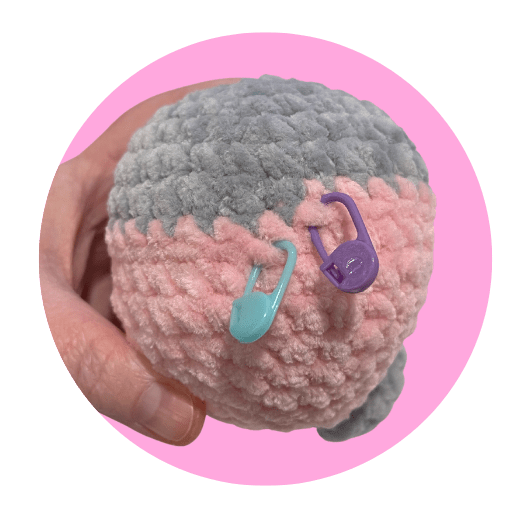
Change to color A. You’ll be adding the ears in the next round. All stitches in round 7 are worked in BLO. You’ll be working the hat brim on the open front loops of this round later. It may help to place stitch markers in the first and last open front loops of this round.
Rd 7 (in BLO): sc 3, sc 4 through first ear and next 4 sts, sc 10, sc 4 through second ear and next 4 sts, sc 3. (24)
Rds 8 & 9: sc around (24)
Rd 10: *sc 2, dec* x 6 (18)
Rd 11: *sc, dec* x 6 (12)
Sl st to next st and fasten off, leaving a long tail for sewing to the body. Do not close head.

Place the eyes between rounds 8 & 9, with about 5 stitches between them.

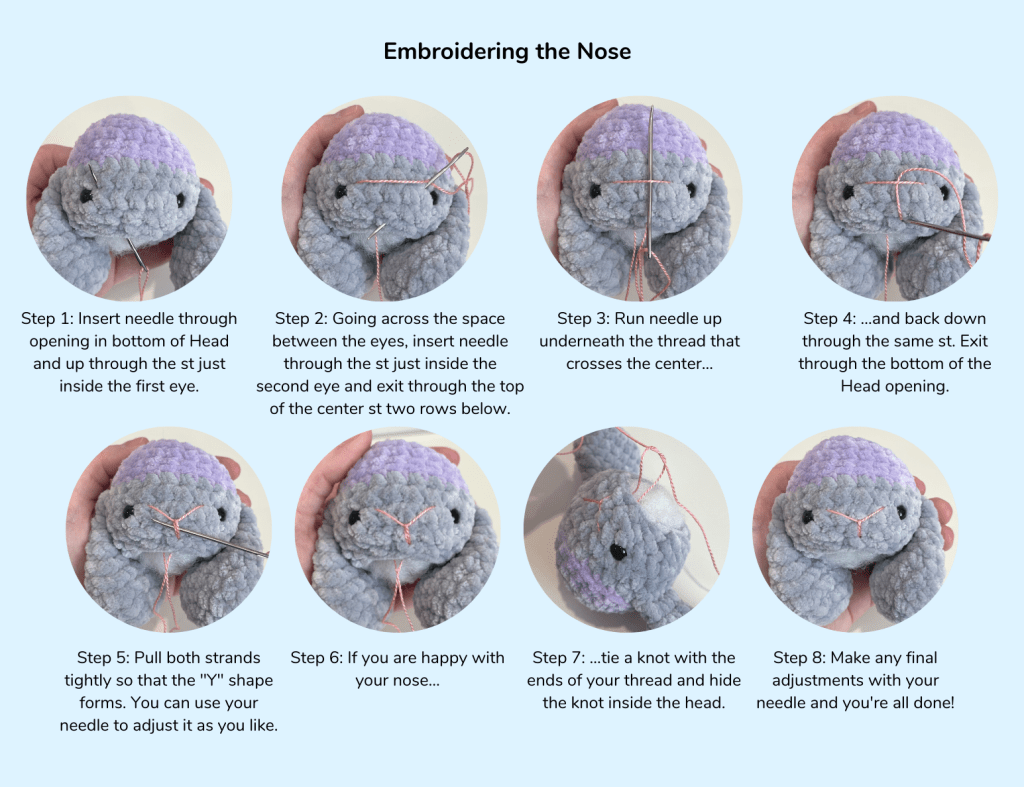
Embroider the nose over rounds 9 & 10. Stuff Head firmly.
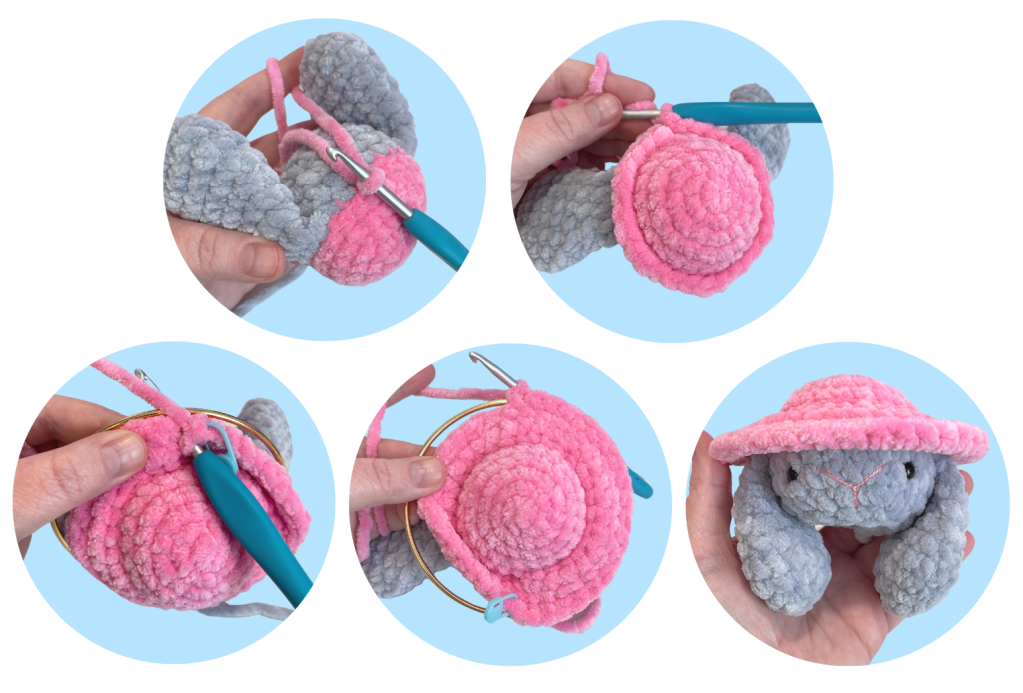
Hat Brim
Hold the Head upside down and attach Color B with a sl st to the first FLO left open in round 7. (Blue marker in photo below.)
Rd 1: *sc 3, inc* x 6 (30)
Rd 2: sc around (30)
Rd 3: *sc 2, inc, sc 2* x 6 (36)
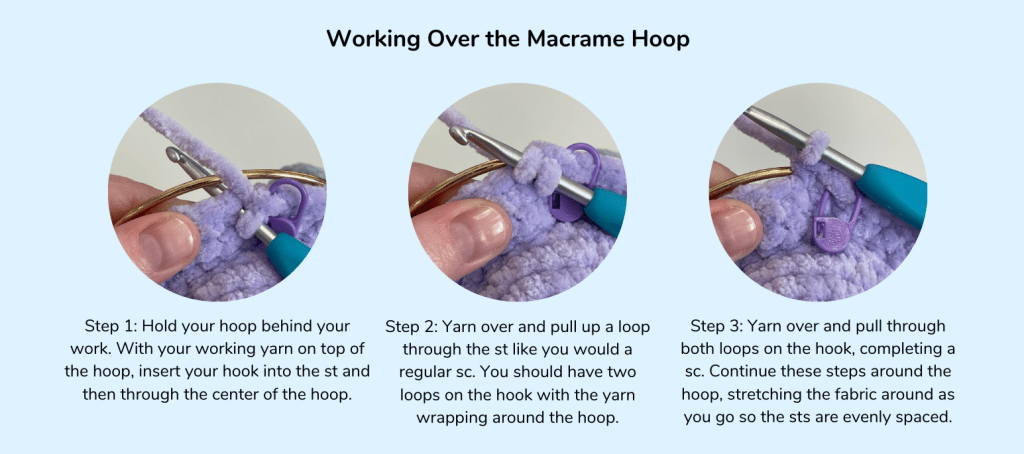
Work all stitches in the next round over the macrame hoop.
Rd 4: sc around (36) see note below
Fasten off and finish with an invisible join. Weave/hide ends.
Note: If your hoop is peeking through your sts a lot, or if you feel your round 4 sts are too tight, you may need to increase in round 4 as follows: *sc 5, inc* x 6 (42). Add even more increases as needed, especially if using a larger hoop or finer yarn.
Body
starting with color A
Tip: Work over the Leg/Feet tails when you add them, leaving them inside the Body.
Rd 1: sc 6 in MR (6)
Rd 2: *inc* x 6 (12)
Rd 3: *sc, inc* x 6 (18)
Rd 4: *sc 2, inc* x 6 (24)
Rd 5: *sc 3, inc* x 6 (30)
You’ll be adding the Legs in the next round. Make sure the Feet are pointing up when you add the Legs.
Rd 6: sc 9, sc 4 through both the first Leg and next 4 sts, sc 3, sc 4 through both the second Leg and next 4 sts, sc 10. (30)
Rd 7: sc around (30)
Change to Color C
Rd 8: sc around (30)
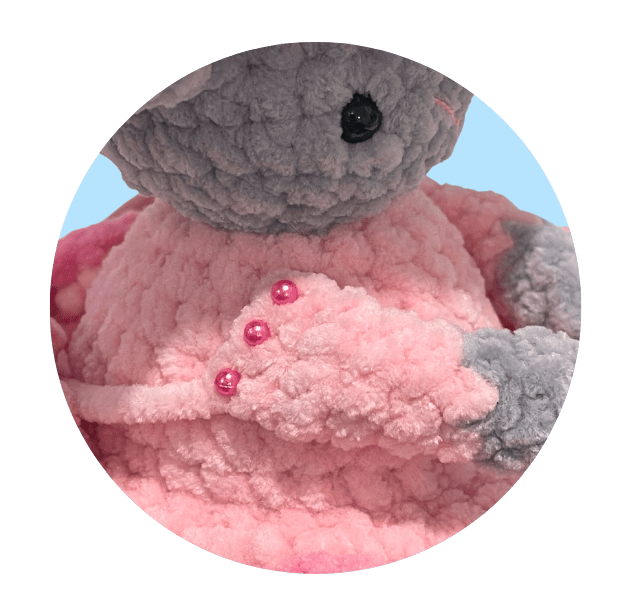
All stitches in round 9 are worked in BLO. You’ll be working the skirt on the open front loops of this round later. It may help to place stitch markers in the first and last open front loops of this round. (See 1st photo in Skirt section below)
Rd 9 (in BLO): sc around (30)
Rd 10: sc around (30)
Rd 11: *sc 3, dec* x 6 (24)
Rd 12: sc around (24)
Rd 13: *sc 2, dec* x 6 (18)
Rd 14: sc around (18)
Begin stuffing, adding more as you go.
Rd 15: *sc, dec* x 6 (12)
Rd 16: sc around (12)
Fasten off, leaving a long tail for closing the Body. Finish stuffing the Body firmly. With tail on your darning needle, weave in and out of 12 remaining FLO and pull to close. Hide end inside Body.
Skirt
(Scroll to the bottom for more Skirt Variations! Tip: When changing colors, carry the yarn instead of cutting it. You’ll have less ends to weave in at the end.)
Starting with Color C
Turn Body upside down and attach yarn with a sl st to last front loop left open in round 9 of the Body. (Blue marker in photo below.)
Rd 1: sc around (30)
Rd 2: *sc, inc* x 15 (45)
Change to Color B
Rd 3: inc x 45 (90)
Change to Color C
Rd 4: sc around (90)
Change to Color B
Rd 5: sc around (90)
Sl st to next st and fasten off, or use invisible join method. Weave all ends

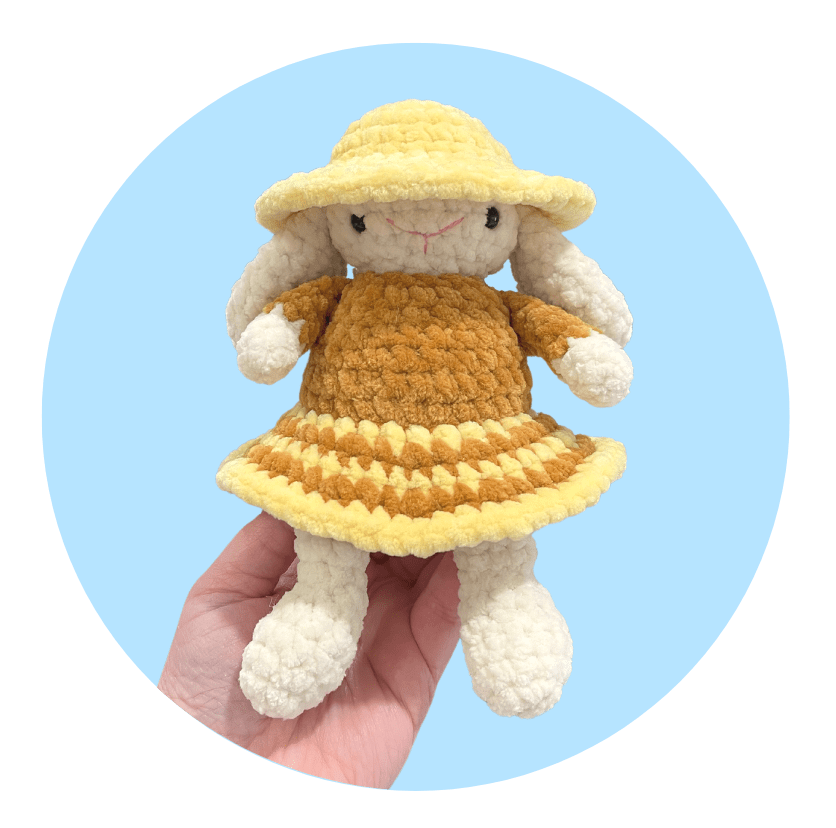
Tip: Mix up the look of the skirt by choosing when/if to do your color changes!
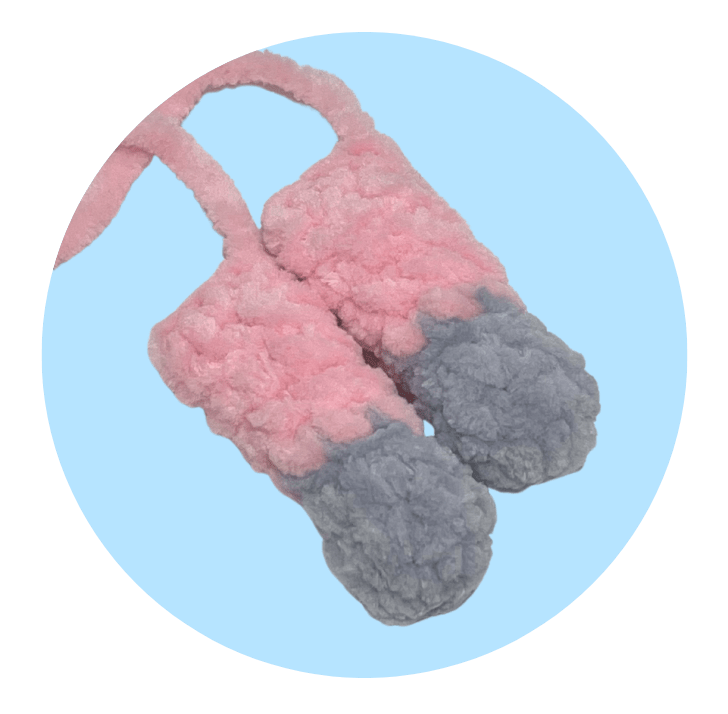
Arms
make 2, starting with color A
Rd 1: sc 6 in MR (6)
Rds 2 & 3: sc around (6)
change to color C
Rd 4 (in BLO): sc around (6)
Rds 5-7: sc around (6)
Do not stuff. Fold Arm in half and sc 3 across the top, going through both sides and closing the Arm. Fasten off, leaving a long tail for sewing to the Body.
Assembly
Sew the Head to the Body at or just above Round 15.

Sew the Arms to the sides of the Body with the color change facing inward and with the Arm at a slight diagonal, leaving a round of the Body visible between the Arms and the Head.
Optional: Use a long length of Color A to embroider a tail over two sts on the bottom, back center, under the skirt. Use a short length of Color A to stitch the ends of the Arms together. You can also secure the Arms to the Body or leave them loose.
Hide all ends.
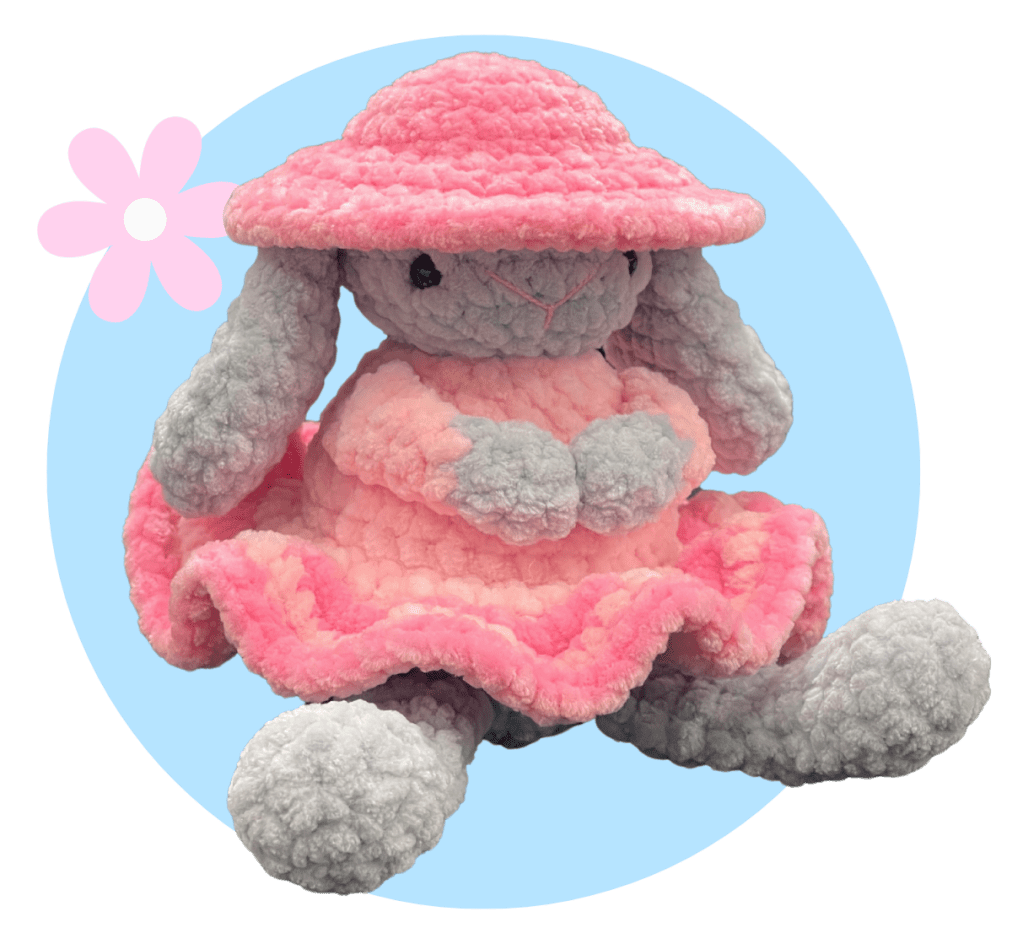
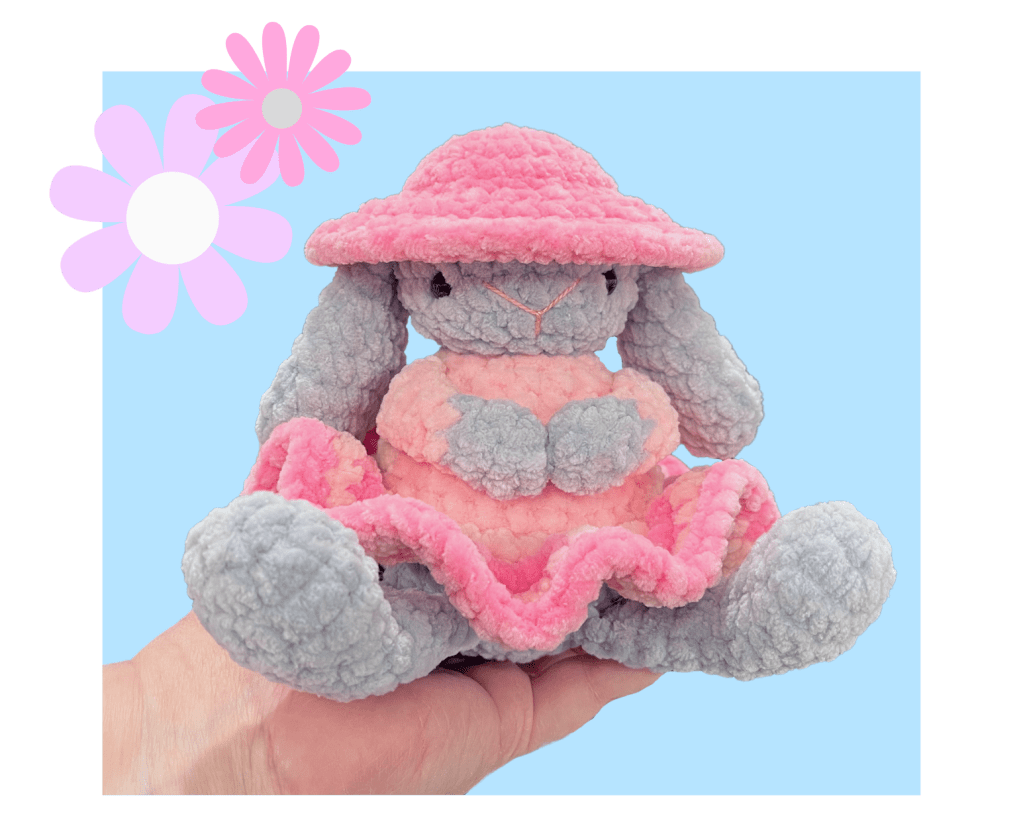
And you’re done! Congratulations on making your very own Garden Party Pal!
I’d love to see your makes on Instagram! Please tag me @jamy.lyn.art and use #GardenPartyPal so I don’t miss your post!
Skirt Variations
Straight Skirt
Starting with Color B
Turn Body upside down and attach yarn with a sl st to last front loop left open in round 9 of the Body.
Rd 1: sc around (30)
Change to Color C
Rd 2: *sc, inc* x 15 (45)
Change to Color B
Rd 3: sc around (45)
Change to Color C
Rd 4: *sc 2, inc* x 15 (60)
Change to Color B
Rd 5: sc around (60)
Sl st to next st and fasten off, or use invisible join method. Weave all ends.
Straight Short Skirt/Peplum
Starting with Color B
Turn Body upside down and attach yarn with a sl st to last front loop left open in round 9 of the Body.
Rd 1: sc around (30)
Change to Color C
Rd 2: *sc, inc* x 15 (45)
Change to Color B
Rd 3: sc around (45)
Change to Color C
Sl st to next st and fasten off, or use invisible join method. Weave all ends.

Tip: have fun with color changes on the Legs, Arms, & Body, too!
Bigger Wave Skirt
Starting with Color C
Turn Body upside down and attach yarn with a sl st to last front loop left open in round 9 of the Body.
Rd 1: sc around (30)
Rd 2: *sc, inc* x 15 (45)
Change to Color D
Rd 3: sc around (45)
Change to Color C
Rd 4: inc x 45 (90)
Change to Color B
Rd 5: sc around (90)
Sl st to next st and fasten off, or use invisible join method. Weave all ends.


You have finished your Garden Party Pal!
Please tag @jamy.lyn.art #jamylynart and @sarahdeecrochet #sarahdeecrochet with all of your projects so we can see and share your wonderful projects.

