
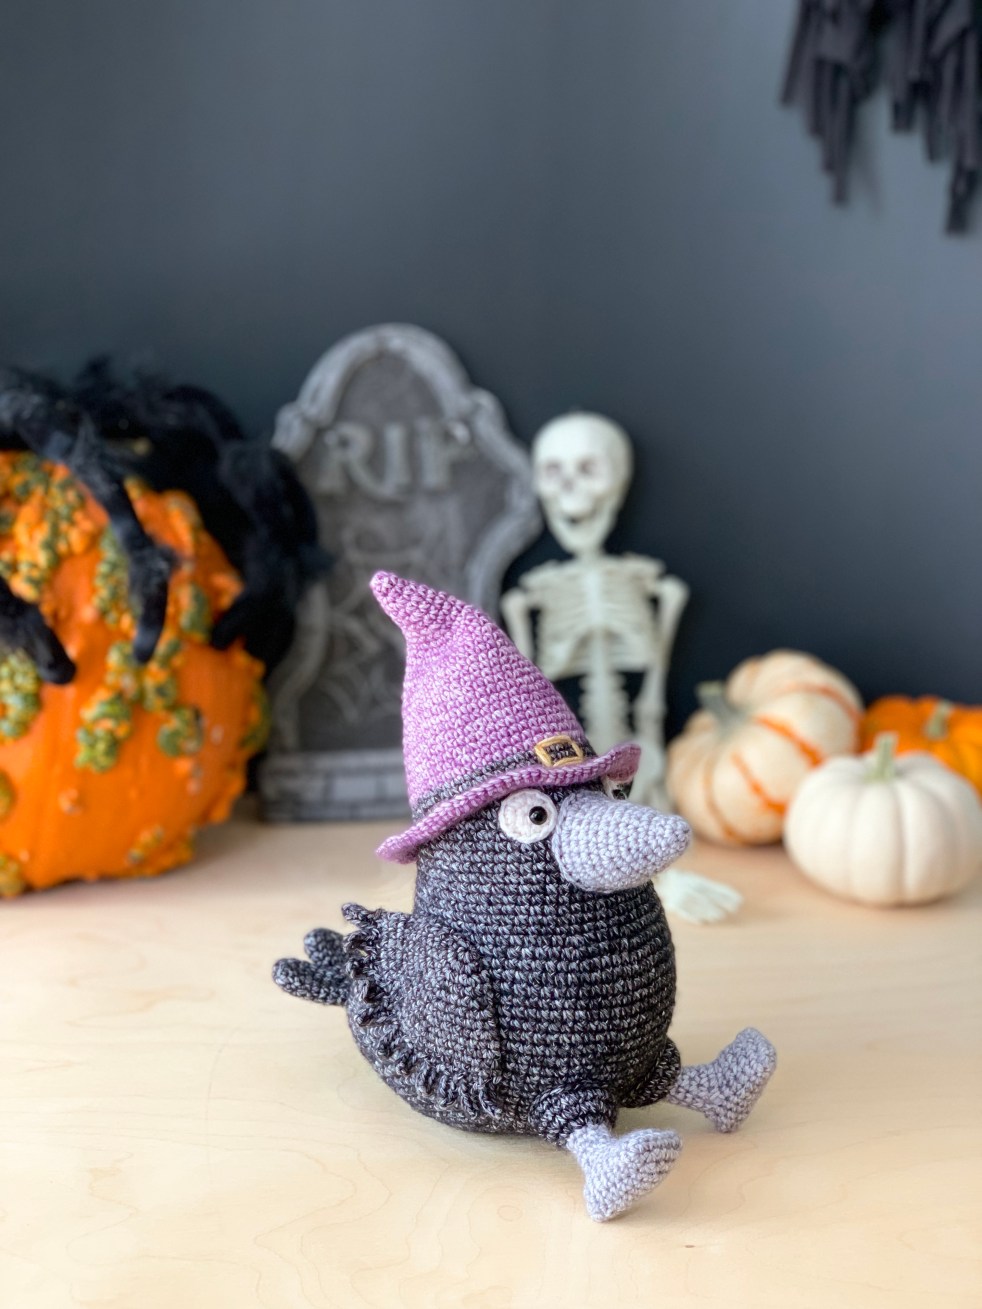
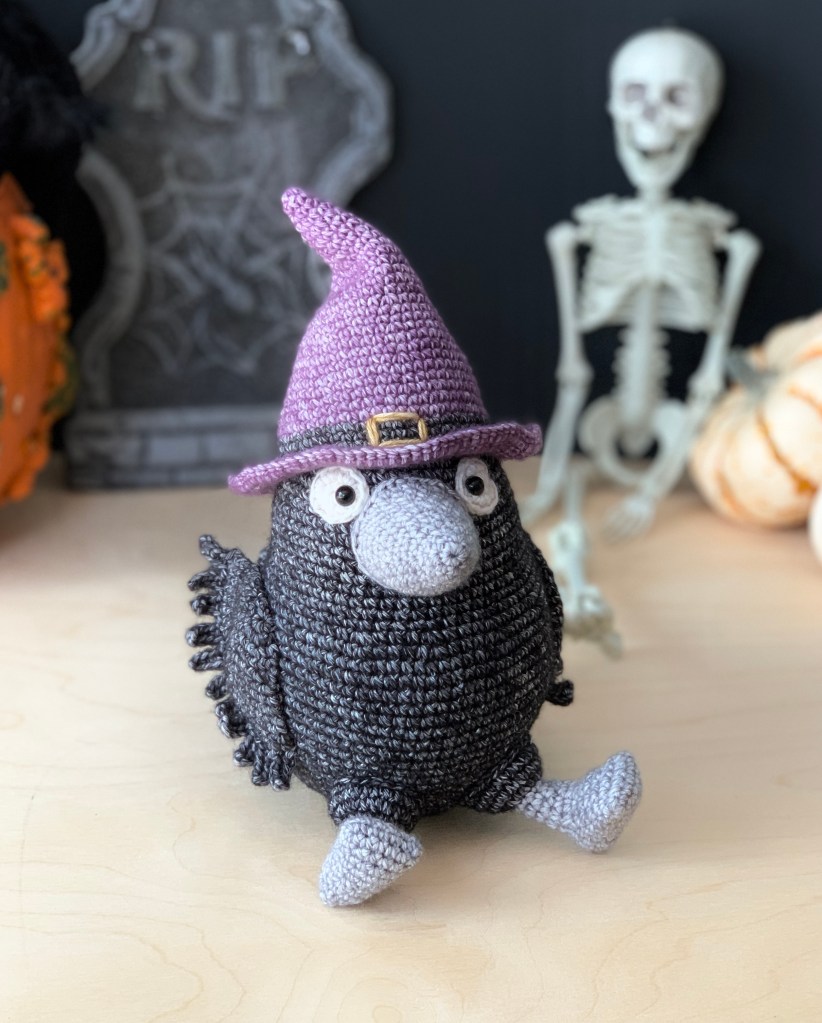
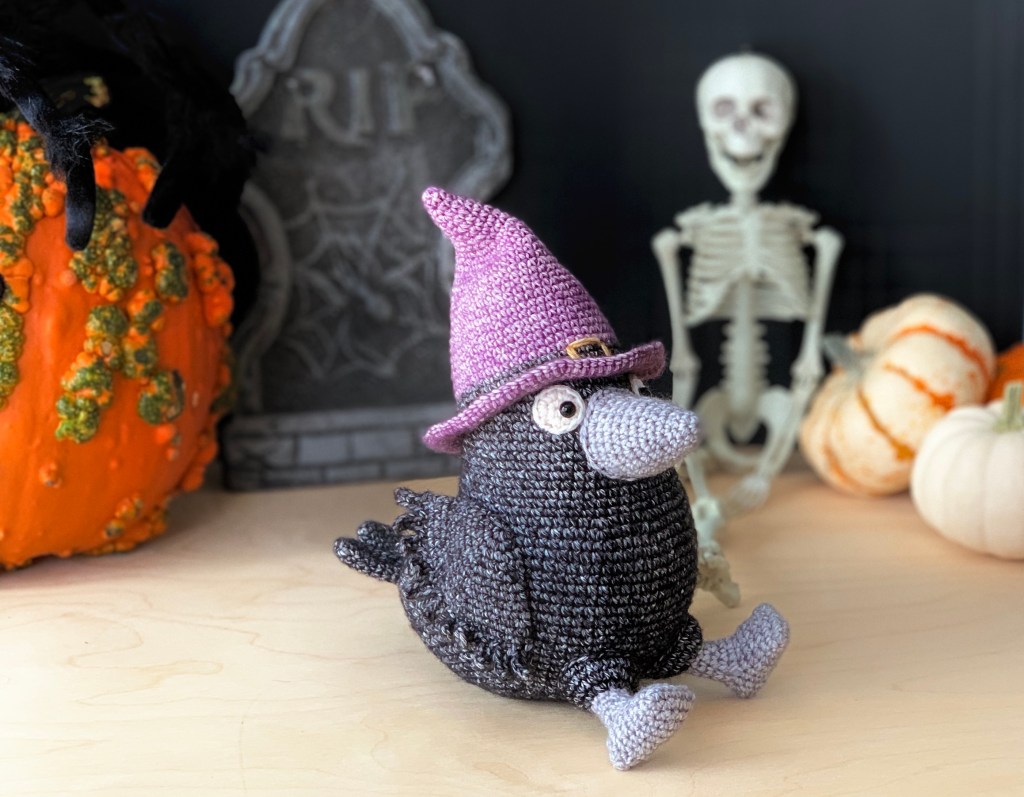
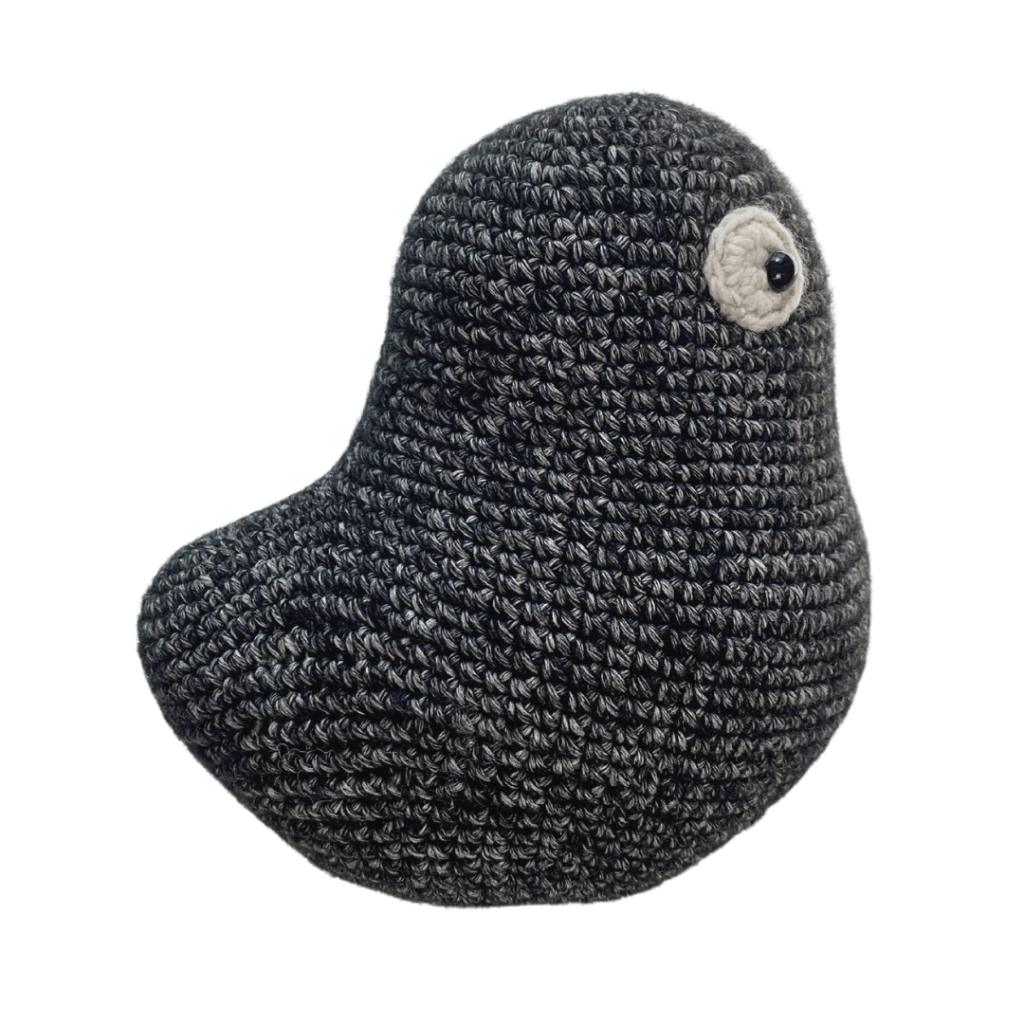
I am so excited to bring you Heckle the Crow! I loved making this silly bird for you. He is slightly outside of my usual work but I think I love that part the most! He will make a great addition to your Halloween decor! My kids love him and have been passing him around for days!
Materials
- 2.75mm hook
- Stitch marker or scrap yarn for running stitch marker
- Scissors
- Weaving needle
- T-Pins
- Yarn
- Polyfill
- 6mm safety eyes
- Pipe cleaner (Optional)
Yarn Used
Scheepjes Stonewashed – Sport/Light DK Weight
Black Onyx(60g) Smokey Quartz(8g) Deep Amethyst(16g) Moonstone(2g)Yellow Jasper(0.5g)
Notes
**Please read through the entire pattern before beginning** The pattern is in US terminology. This pattern is made in continuous rounds. Take care to always move the stitch marker up to the last stitch at the end of each round. The stitch count is in ( ) at the end of each row. Make sure to have the correct number of stitches before moving on to the next round.
Legal
This pattern is for personal use only. You may sell the items that you make from this pattern, but I ask that you please refer back to ©️SarahDeeCrochet as the designer. Altering, reproducing, or selling this pattern, online or in print is strictly prohibited. This pattern is protected by international copyright laws.
Please reach out and contact me if you have any issues, I am here to help you!
Alright! Let’s get started making Heckle.
Pattern
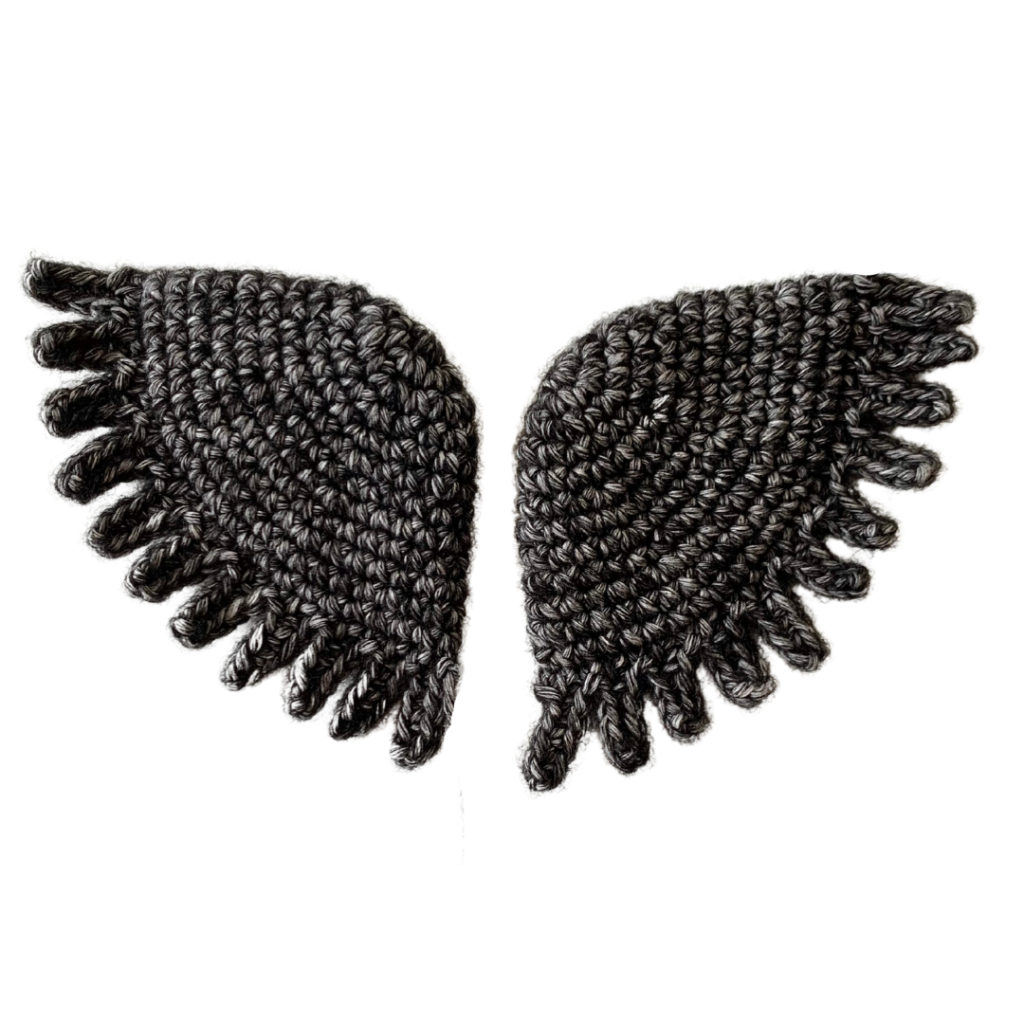
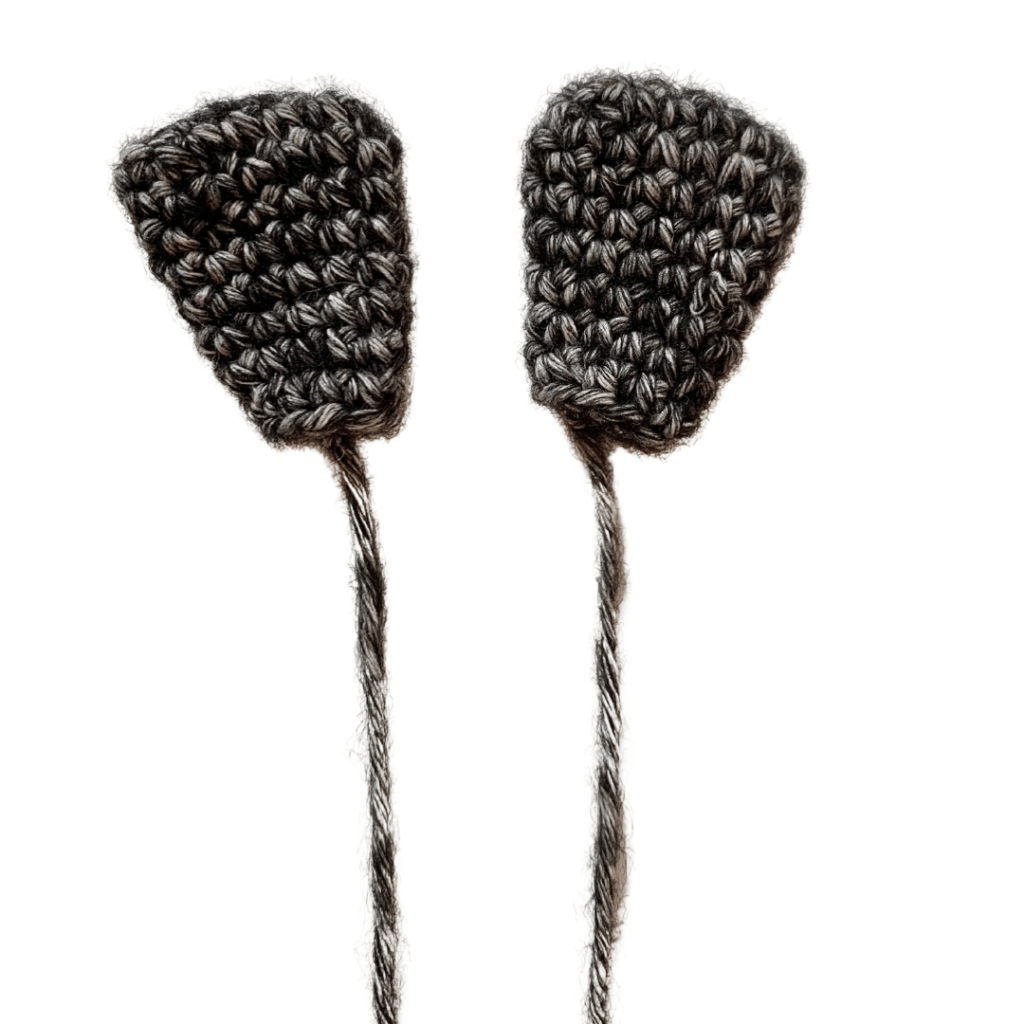
Wings x 2
Using Black Onyx
Rnd 1: 6sc in a MR (6)
Rnd 2: inc x 6 (12)
Rnd 3: [sc, inc] x 6 (18)
Rnd 4: [5sc, inc] x 3 (21)
Rnd 5: [6sc, inc] x 3 (24)
Rnd 6: [3sc, inc] x 6 (30)
Rnd 7: sc in each st (30)
Rnd 8: [4sc, inc] x 6 (36)
Rnd 9: sc in each st (36)
Rnd 10: [5sc, inc] x 6 (42)
Rnd 11-12: sc in each st (42)
Fold the wing in half and work through both sides for rnd 13. Do not stuff the wings. Make sure you pull your sl sts tight in rnd 13.
Rnd 13: [sc, ch5, starting in the 2nd ch from hook, 4sc in each ch through the back humps, sl st into the next st] x 10. You should have one st left to work, ch5, starting in the 2nd ch from hook, sc in each ch, sl st into the last st.
FO and cut yarn, leave a tail for sewing to the body. You should have 11 feathers across the bottom of the wings.
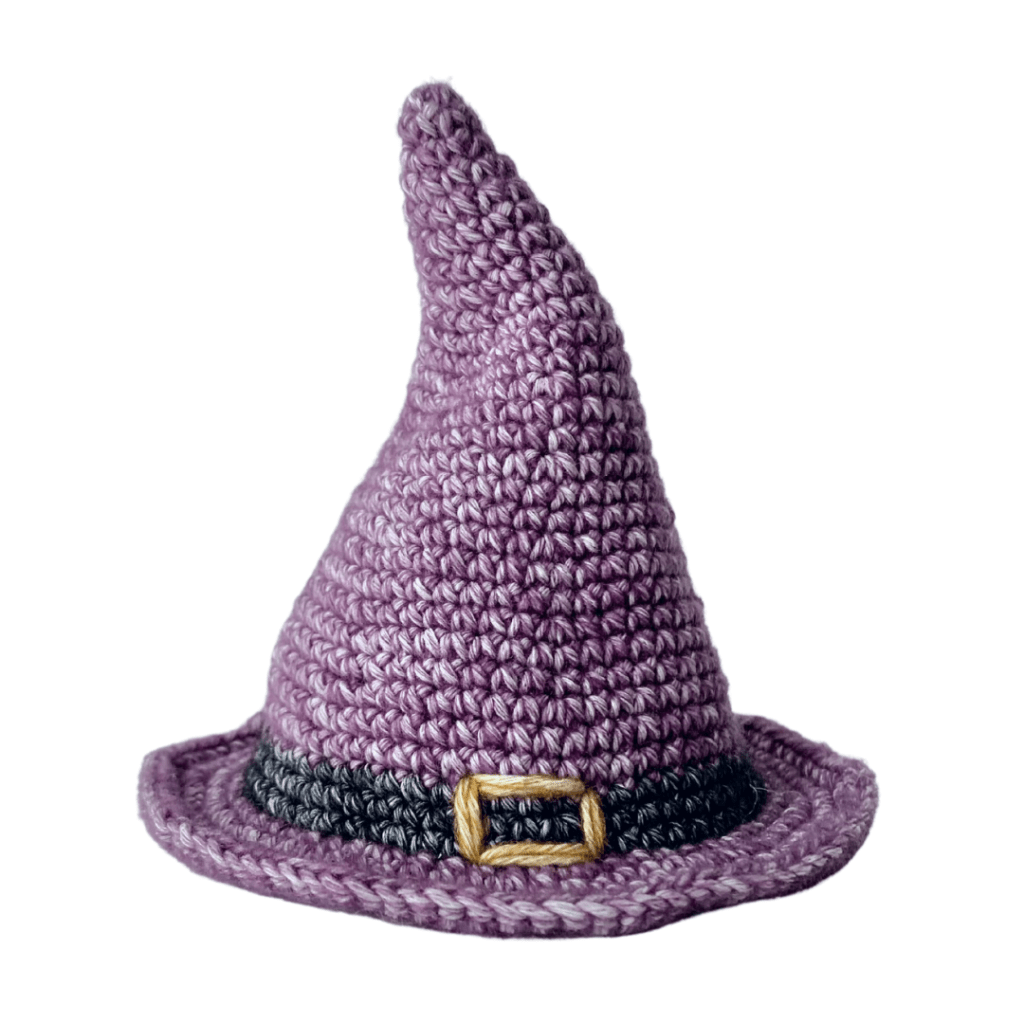
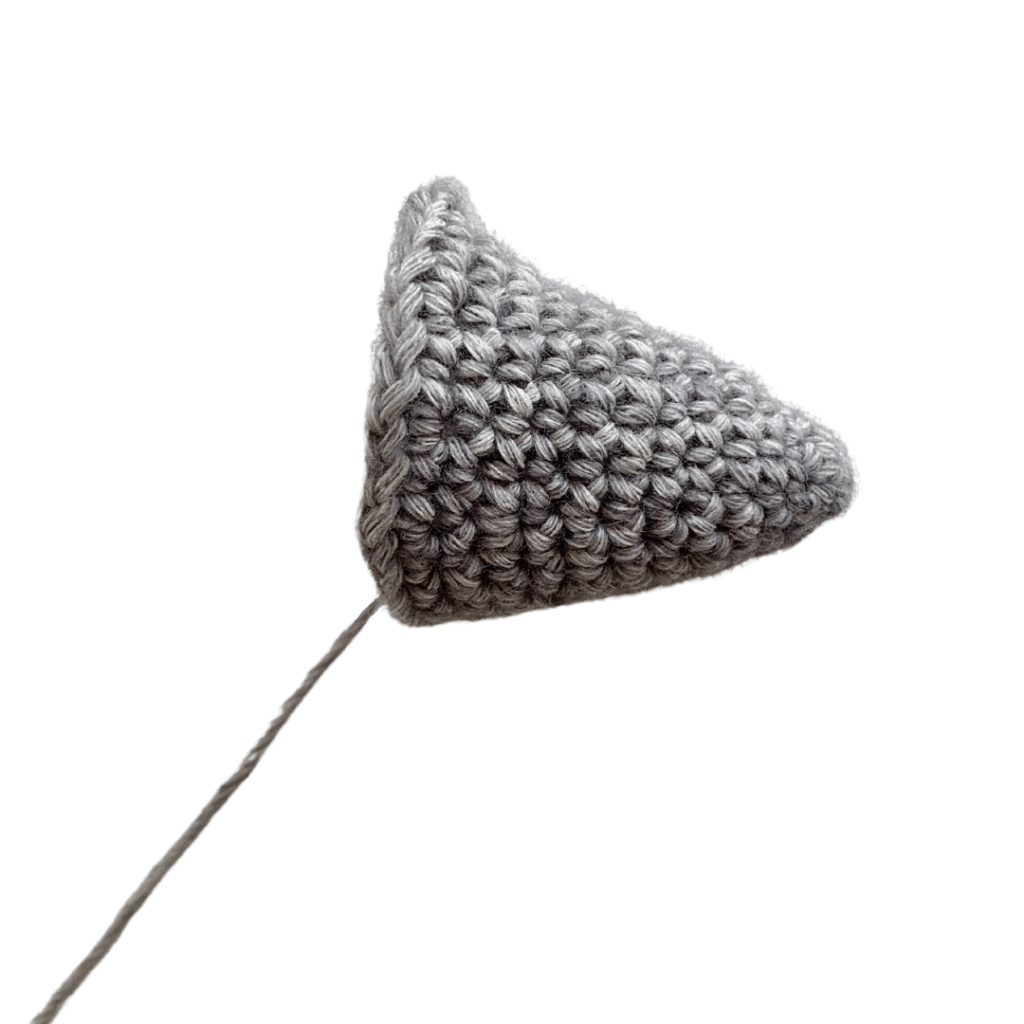
Hat
Starting with Deep Amethyst
Rnd 1: 6sc in a MR (6)
Rnd 2: sc in each st (6)
Rnd 3: [sc, inc] x 3 (9)
Rnd 4: [2sc, inc] x 3 (12)
Rnd 5: sc in each st (12)
Rnd 6: [3sc, inc] x 3 (15)
Rnd 7: sc in each st (15)
Rnd 8: [4sc, inc] x 3 (18)
Rnd 9: sc in each st (18)
Rnd 10: [2sc, inc] x 6 (24)
Rnd 11-12: sc in each st (24)
Rnd 13: [3sc, inc] x 6 (30)
Rnd 14-15: sc in each st (30)
Rnd 16: [4sc, inc] x 6 (36)
Rnd 17-18: sc in each st (36)
Rnd 19: [5sc, inc] x 6 (42)
Rnd 20-21: sc in each st (42)
Rnd 22: [6sc, inc] x 6 (48)
Rnd 23-24: sc in each st (48)
Rnd 25: [7sc, inc] x 6 (54)
Rnd 26-27: sc in each st (54)
Change to Black Onyx
Rnd 28: sc in each st (54)
Rnd 29: [8sc, inc] x 6 (60)
Rnd 30: sc in each st (60)
Change to Deep Amethyst
Rnd 31: Working through FLO – [5sc, inc] x 10 (70)
Rnd 32: [3sc, inc, 3sc] x 10 (80)
Rnd 33: [7sc, inc] x 10 (90)
Place one more sc, then sl st into the next st to FO. Cut leave a tail for sewing to the head. Stuff the bottom of the hat lightly. I placed a pipe cleaner in the hat so that I could bend the top and it would stay in place. Embroider the buckle on the hat, using Yellow Jasper, covering 4 sts, over rnds 28-30
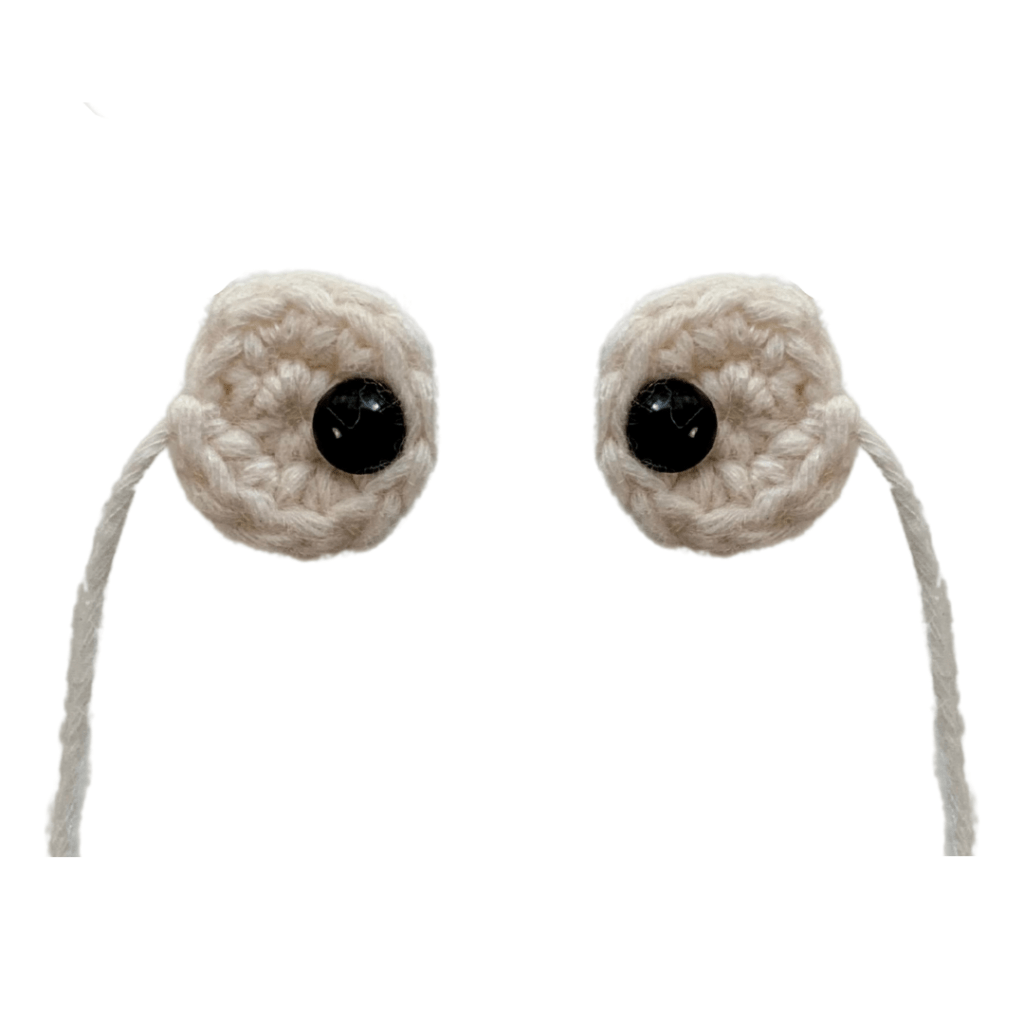
Eyes x 2
Using Moonstone
Rnd 1: 6sc in a MR (6)
Rnd 2: inc x 6 (12)
Sl st into the next st to FO. Leave a long tail for sewing to the head. Insert your 6mm safety eye in between rnds 1&2. Do not place the back on yet. Your safety eyes will go through both fabrics, the whites of the eyes and the crow body.
Beak
Using Smokey Quartz
Rnd 1: 6sc in a MR (6)
Rnd 2: [sc, inc] x 3 (9)
Rnd 3: sc in each st (9)
Rnd 4: [sc, inc] x 3, 3sc (12)
Rnd 5: [2sc, inc] x 3, 3sc (15)
Rnd 6: sc in each st (15)
Rnd 7: [3sc, inc] x 3, 3sc (18)
Rnd 8: sc in each st (18)
Rnd 9: [4sc, inc] x 3, 3sc (21)
Rnd 10: sc in each st (21)
Rnd 11: [5sc, inc] x 3, 3sc (24)
Rnd 12: sc in each st (24)
Rnd 13: 5sc, [sc, inc] x 6, 7sc (30)
Sl st into the next st to FO. Cut yarn, leave a tail for sewing to the head. Stuff lightly.
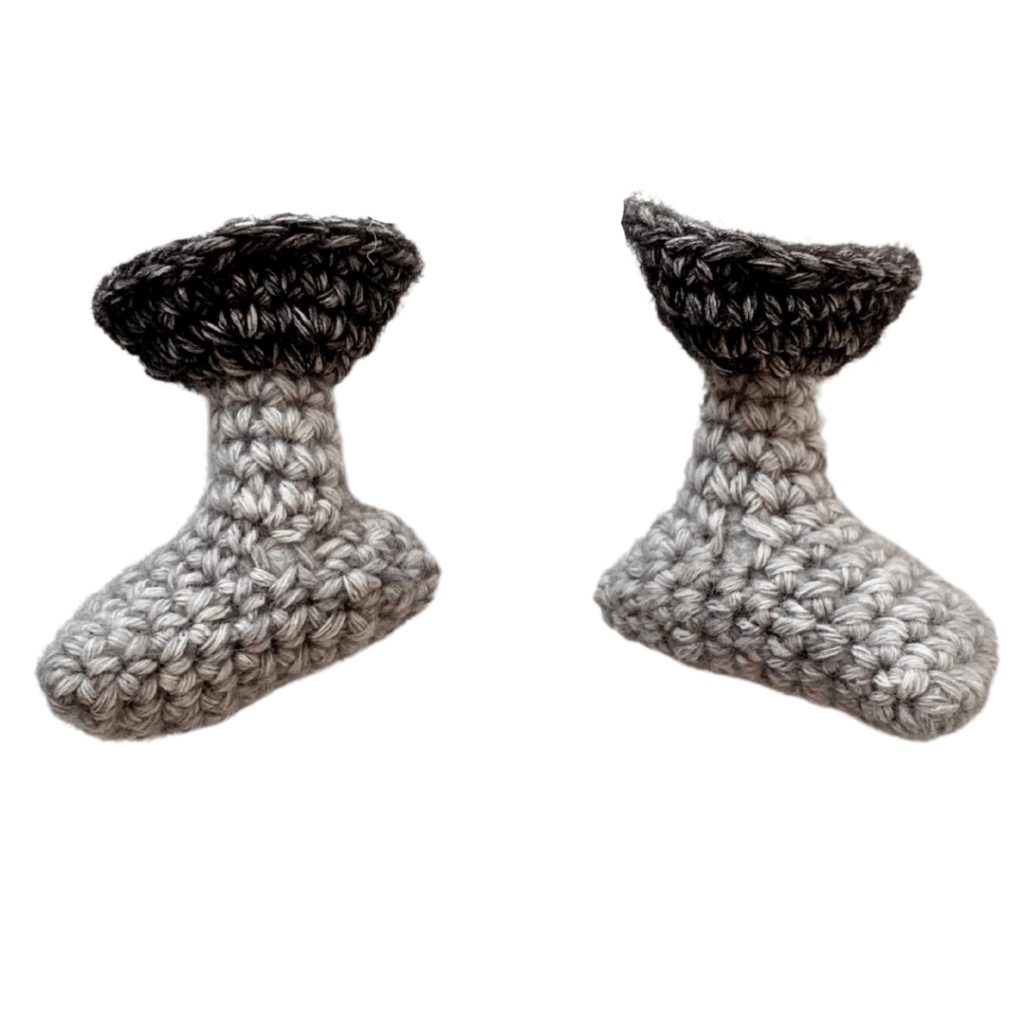
Feet x 2
Using Smokey Quartz
Rnd 1: Ch 7, starting in the second ch from hook, 6sc across through the back humps. (12)
Both sides of the foundation row are counted as sts.
Rnd 2: Work in the next available st, on the opposite side of the piece, inc, 5sc, continue working around, inc, 5sc (14)
Rnd 3-4: sc in each st (14)
Rnd 5: 12sc, dec (13)
Rnd 6: 11sc, dec (12)
Rnd 7: 2sc, ch5, skip5, 5sc (12)
Rnd 8: sc in each st (12)
Rnd 9: [4sc, dec] x 2 (10)
Rnd 10: dec x 5 (5)
Sl st into the next st to FO and cut yarn. Weave your tail through FLO of the remaining 5 stitches, pull to close and hide the ends inside of the body. Stuff the feet lightly.
Legs x 2
Starting with Smokey Quartz
Attach yarn with a knot to the farthest st to the left, on the back of the feet and pull up a loop.
Rnd 1: sc in each of the 10 sts left by skipping sts (10)
Rnd 2: [3sc, dec] x 2 (8)
Rnd 3-5: sc in each st (8)
Change to Black Onyx
Rnd 6: inc x 8 (16)
Rnd 7: [sc, inc] x 8 (24)
Rnd 8: sc in each st (24)
Rnd 9: 8sc, 10sl st, 6sc (24)
Sl st into the next st to FO. Cut yarn and leave a tail for sewing to the body. Stuff the legs. The 10sl sts should be at the top front of the leg, lined up with the feet.
Body
Using Black Onyx
Rnd 1: 6sc in a MR (6)
Rnd 2: inc x 6 (12)
Rnd 3: [sc, inc] x 6 (18)
Rnd 4: [2sc, inc] x 6 (24)
Rnd 5: [3sc, inc] x 6 (30)
Rnd 6: [4sc, inc] x 6 (36)
Rnd 7: [5sc, inc] x 6 (42)
Rnd 8: [6sc, inc] x 6 (48)
Rnd 9: [7sc, inc] x 6 (54)
Rnd 10-22: sc in each st (54)
Adding the tail and start the body.
Rnd 23: Ch9, starting in the 2nd ch from hook. sc in each ch through the back humps, 20sc around the body, [inc, 3sc] x 4, 18sc (74) Each side of the tail is added in the st count.
Rnd 24: 6sc, [inc] x 4, 27sc, [inc, 4sc] x 4, 17sc (82)
Add the eyes between rnds 11&12, approximately 10 sts apart. The whites of the eyes should be around 8 sts apart. Do not add the backs until you are sure of your placement. I placed mine slightly off center so he is looking to the side. Use the tail of the bird for reference. Leave the tail for the white of the eye on the outside of the body, we will use these to sew the whites of the eyes to the body.
Rnd 25: 6sc, [sc, inc] x 4, 68sc (86)
Rnd 26: 6sc, [2sc, inc] x 4, 68sc (90)
Rnd 27-32: sc in each st (90)
Rnd 33: [7sc, dec] x 10 (80)
Rnd 34: sc in each st (80)
Rnd 35: [6sc, dec] x 10 (70)
Rnd 36: sc in each st (70)
Rnd 37: [5sc, dec] x 10 (60)
Rnd 38: sc in each st (60)
Rnd 39: [8sc, dec] x 6 (54)
Rnd 40: sc in each st (54)
Rnd 41: [7sc, dec] x 6 (48)
Rnd 42: sc in each st (48)
Rnd 43: [6sc, dec] x 6 (42)
Rnd 44: [5sc, dec] x 6 (36)
Start stuffing, continue stuffing until the last rnd.
Rnd 45: [4sc, dec] x 6 (30)
Rnd 46: [3sc, dec] x 6 (24)
Rnd 47: [2sc, dec] x 6 (18)
Rnd 48: [sc, dec] x 6 (12)
Rnd 49: dec x 6 (6)
Sl st into the next st to FO. Weave your tail through FLO of the remaining 6 stitches, pull to close and hide the ends inside of the body.
Tail Feathers x 2
Using Black Onyx
Rnd 1: Ch7, starting in the second ch from hook, 6sc across through the back humps. (12)
Both sides of the foundation row are counted as sts.
Rnd 2: Work in the next available st, on the opposite side of the piece, inc, 5sc, continue working around, inc, 5sc (14)
Rnd 3-4: sc in each st (14)
Rnd 5: 12sc, dec (13)
Rnd 6: 11sc, dec (12)
Rnd 7: 10sc, dec (11)
Rnd 8: 9sc, dec (10)
Rnd 9: [3sc, dec] x 2 (8)
Sl st into the next st to FO, and leave a tail for sewing. Do not stuff.
Assembly
Use straight pins to hold all pieces together while you are sewing.
Sew the whites of the eyes to the head over rnds 10-13.
Sew the beak over rnds 10-18, centered between the eyes.
Sew the legs to the front of the body over rnds 34-42, approximately 5 sts apart.
Sew the tail feathers, side by side, on the back of the body over rnds 25&26.
Sew the wings to either side of the body over rnds 21-34. Make sure they are lined up with each other. Use rnd 1 as a guide when lining them up.
Sew the hat to the top of the head.

Check out my Youtube & Instagram Reels for helpful embroidery & sewing videos!
I hope you enjoyed this pattern! I had a lot of fun making him for you. Please leave me comments below and tell me what you think!!
Discover more from SarahDee Crochet
Subscribe to get the latest posts sent to your email.


Hola! Es hermoso! Recién lo veo y me encanta! Muchísimas gracias! ❤️🥰😘 Saludos desde Mar del Plata Argentina 🇦🇷
LikeLiked by 1 person
Ce corbeau est magnifique . Félicitations, j’ai gardé votre nom et adresse de votre page. Dès que j’ai le temps de le faire, je vous l’envoie. Un grand merci Joce
LikeLike
I just found your page, I love this pattern! I can’t wait to crochet it!😍🐦⬛
LikeLiked by 1 person
Welcome! I am so happy to hear that. I can’t wait to see what you make! ❤️
LikeLike
Thank you very much for this beautiful pattern!But I got a question ^^. I dont understand why the increases are at the beginning in row 25 & 26 for the bidy part. 🤔 Both side of the body doesn’t have the same shape. Can you help me with this?
LikeLike
Hi there! The increases at the beginning of 25 and 26 are just shaping rounds for the belly. They don’t have the same shape because one side is the front belly and the other side will be the back of the body for the tail protrusion. Trust the process!! 🥰
LikeLike